Husqvarna AUTOMOWER SOLAR HYBRID Operation Manual - Page 47
Installation 3
 |
View all Husqvarna AUTOMOWER SOLAR HYBRID manuals
Add to My Manuals
Save this manual to your list of manuals |
Page 47 highlights
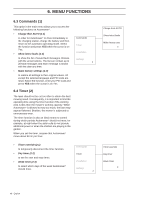
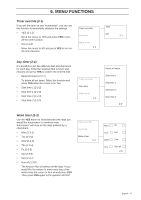
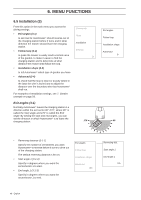
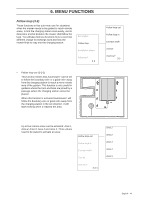
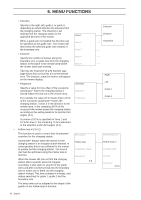
6. MENU FUNCTIONS 6.5 Installation (3) From this option in the main menu you access the driving settings. Commands • Exit angles (3-1) to set how far Automower® should reverse out of the charging station before it turns and in what direction the mower should leave the charging station. • Follow loop (3-2) Timer Installation Settings to guide the mower to easily reach a remote area of the garden, to make it easier to find the 3 charging station and to determine at what distance the mower shall follow the loop. • Installation shape (3-3) to tell Automower® which type of garden you have. • Advanced (3-4) to check that the loop is intact or exactly where in the lawn the wire is buried and to adjust the distance over the boundary wire that Automower® shall run. For examples of Installation settings, see 7. Garden example on page 59. Exit angles (3-1) Normally Automower® leaves the charging station in a direction within the exit sector 90°-270°, where 90° is called the Start angle and 270° is called the End angle. By setting the start and end angles, you can set the direction in which Automower® is to leave the charging station. Exit angles Follow loop Installation shape Advanced 3- • Reversing distance (3-1-1) Specify the number of centimetres you want Automower® to reverse before it turns to drive out of the charging station. The default reversing distance is 60 cm. • Start angle 1 (3-1-2) Specify in degrees where you want the sector/sector 1 to start. • End angle 1 (3-1-3) Specify in degrees where you want the sector/sector 1 to end. Exit angles Follow loop Installation shape Advanced 3-1 Reversing dist. Start angle 1 End angle 1 3-1- 48 - English
-
 1
1 -
2
-
3
-
4
-
5
-
6
-
7
-
8
-
9
-
10
-
11
-
12
-
13
-
14
-
15
-
16
-
17
-
18
-
19
-
20
-
21
-
22
-
23
-
24
-
25
-
26
-
27
-
28
-
29
-
30
-
31
-
32
-
33
-
34
-
35
-
36
-
37
-
38
-
39
-
40
-
41
-
 42
42 -
 43
43 -
 44
44 -
 45
45 -
 46
46 -
 47
47 -
 48
48 -
 49
49 -
 50
50 -
 51
51 -
 52
52 -
53
-
54
-
55
-
56
-
57
-
58
-
59
-
60
-
61
-
62
-
63
-
64
-
65
-
66
-
67
-
68
-
69
-
70
-
71
-
72
-
73
-
74
 |
 |
