Husqvarna AUTOMOWER SOLAR HYBRID Operation Manual - Page 43
Menu functions
 |
View all Husqvarna AUTOMOWER SOLAR HYBRID manuals
Add to My Manuals
Save this manual to your list of manuals |
Page 43 highlights
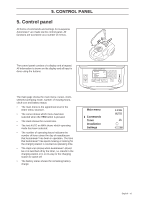
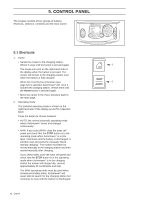
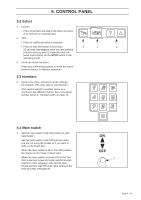
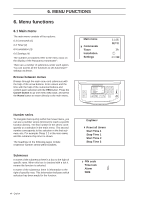
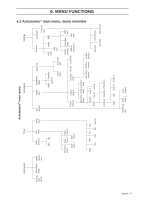
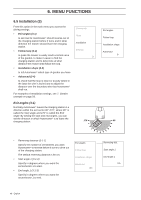
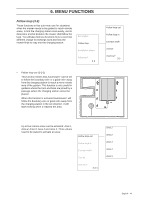
6. MENU FUNCTIONS 6. Menu functions 6.1 Main menu The main menu consists of four options: 6.3 Commands (1) 6.4 Timer (2) 6.5 Installation (3) 6.6 Settings (4) The numbers in brackets refer to the menu rows on the display of the Husqvarna Automower®. There are a number of submenus under each option. You can access all the functions to set Automower® settings via these. Browse between menus Browse through the main menu and submenus with the help of the arrow buttons. Enter values and the time with the help of the numerical buttons and confirm each selection with the YES button. Press the Cancel button to go one menu step back, and press the Home button to return directly to the main menu. Main menu Commands Timer Installation Settings Main menu Commands Timer Installation Settings Number series To navigate more quickly within the mower menu, you can use a number series (shortcut) to reach a specific function directly. The first number in the series corresponds to a selection in the main menu. The second number corresponds to the selection in the first submenu etc. For example: Press 2 2 in the main menu and the submenu Day timer is shown. The headings on the following pages include respective number series within brackets. Submenus In some of the submenus there is a box to the right of specific rows. When this box is checked with a tick it means the function is selected. In some of the submenus there is information to the right of specific rows. This information indicates which selection has been made for the function. Daytimer Reset all timers Start Time 1 Stop Time 1 Start Time 2 Stop Time 2 PIN code Time lock Alarm SMS 44 - English
-
 1
1 -
2
-
3
-
4
-
5
-
6
-
7
-
8
-
9
-
10
-
11
-
12
-
13
-
14
-
15
-
16
-
17
-
18
-
19
-
20
-
21
-
22
-
23
-
24
-
25
-
26
-
27
-
28
-
29
-
30
-
31
-
32
-
33
-
34
-
35
-
36
-
37
-
 38
38 -
 39
39 -
 40
40 -
 41
41 -
 42
42 -
 43
43 -
 44
44 -
 45
45 -
 46
46 -
 47
47 -
 48
48 -
49
-
50
-
51
-
52
-
53
-
54
-
55
-
56
-
57
-
58
-
59
-
60
-
61
-
62
-
63
-
64
-
65
-
66
-
67
-
68
-
69
-
70
-
71
-
72
-
73
-
74
 |
 |
