IBM 306m User Guide - Page 37
Installing, memory, module
 |
UPC - 000435867605
View all IBM 306m manuals
Add to My Manuals
Save this manual to your list of manuals |
Page 37 highlights
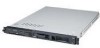
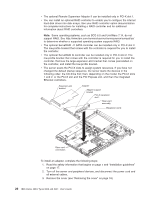
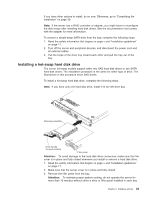
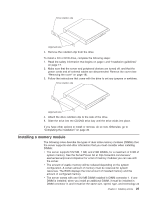
4. Remove the retention clip from the drive. To install a CD or DVD drive, complete the following steps: 1. Read the safety information that begins on page v and "Installation guidelines" on page 17. 2. Make sure that the server and peripheral devices are turned off, and that the power cords and all external cables are disconnected. Remove the cover (see "Removing the cover" on page 18). 3. Follow the instructions that come with the drive to set any jumpers or switches. 4. Attach the drive retention clip to the side of the drive. 5. Slide the drive into the CD/DVD drive bay until the drive clicks into place. If you have other options to install or remove, do so now. Otherwise, go to "Completing the installation" on page 30. Installing a memory module The following notes describe the types of dual inline memory modules (DIMMs) that the server supports and other information that you must consider when installing DIMMs: v The server supports 512 MB, 1 GB, and 2 GB DIMMs, for a maximum of 8 GB of system memory. See the ServerProven list at http://www.ibm.com/servers/ eserver/serverproven/compat/us/ for a list of memory modules you can use with the server. v The amount of usable memory will be reduced depending on the system configuration. A certain amount of memory must be reserved for system resources. The BIOS displays the total amount of installed memory and the amount of configured memory. v The server comes with one 512 MB DIMM installed in DIMM connector 1. If one DIMM is installed, when you install an additional DIMM, it must be installed in DIMM connector 3, and it must be the same size, speed, type, and technology as Chapter 2. Installing options 25
-
 1
1 -
2
-
3
-
4
-
5
-
6
-
7
-
8
-
9
-
10
-
11
-
12
-
13
-
14
-
15
-
16
-
17
-
18
-
19
-
20
-
21
-
22
-
23
-
24
-
25
-
26
-
27
-
28
-
29
-
30
-
31
-
 32
32 -
 33
33 -
 34
34 -
 35
35 -
 36
36 -
 37
37 -
 38
38 -
 39
39 -
 40
40 -
 41
41 -
 42
42 -
43
-
44
-
45
-
46
-
47
-
48
-
49
-
50
-
51
-
52
-
53
-
54
-
55
-
56
-
57
-
58
-
59
-
60
-
61
-
62
-
63
-
64
-
65
-
66
-
67
-
68
-
69
-
70
-
71
-
72
-
73
-
74
 |
 |
