IBM 306m User Guide - Page 57
Using, baseboard, management, controller, Installing, SMBridge, utility, program
 |
UPC - 000435867605
View all IBM 306m manuals
Add to My Manuals
Save this manual to your list of manuals |
Page 57 highlights
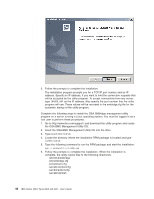
1. Turn on the server. 2. When the message Press for SAS/SATA Configuration Utility appears, press Ctrl+A. 3. Select Array Configuration Utility (ACU). 4. Select Create Array. 5. From the list of ready drives, select the two drives that you want to group into the array. 6. When you are prompted to select the RAID level, select RAID-1. 7. (Optional) Type an identifier for the array. 8. When you are prompted for the array build method, select Quick Int. 9. Follow the instructions on the screen to complete the configuration; then, select Done to exit. 10. Restart the server. Viewing the configuration: To view information about the SAS/SATA controller, complete the following steps: 1. Start the SAS/SATA Configuration Utility program. 2. From the SAS/SATA Configuration Utility window, select Manage Arrays. 3. Select an array and press Enter. 4. To exit from the program, press Esc. Using the baseboard management controller The mini-baseboard management controller provides environmental monitoring for the server. If environmental conditions exceed thresholds or if system components fail, the baseboard management controller lights LEDs to help you diagnose the problem and also records the error in the mini-BMC system event log. Important: If the system-error LED on the front of the server is lit but there are no other error indications, clear the system event/error log. This log does not clear itself, and if it begins to fill up, the system-error LED will be lit. Also, after you complete a repair or correct an error, clear the system event/error log to turn off the system-error LED on the front of the server. The baseboard management controller also provides the command-line interface (IPMI Shell) remote server management capabilities through the OSA SMBridge management utility program. The command-line interface provides direct access to server management functions through the IPMI 1.5 protocol. Use the command-line interface to issue commands to control the server power, view system information, and identify the server. You can also save one or more commands as a text file and run the file as a script. Installing the OSA SMBridge management utility program Complete the following steps to install the OSA SMBridge management utility program on a server running a Windows operating system: 1. Go to http://www.ibm.com/support/ and download the utility program and create the OSA BMC Management Utility CD. 2. Insert the OSA BMC Management Utility CD into the drive. The InstallShield wizard starts, and a window similar to that shown in the following illustration opens. Chapter 3. Configuring the server 45
-
 1
1 -
2
-
3
-
4
-
5
-
6
-
7
-
8
-
9
-
10
-
11
-
12
-
13
-
14
-
15
-
16
-
17
-
18
-
19
-
20
-
21
-
22
-
23
-
24
-
25
-
26
-
27
-
28
-
29
-
30
-
31
-
32
-
33
-
34
-
35
-
36
-
37
-
38
-
39
-
40
-
41
-
42
-
43
-
44
-
45
-
46
-
47
-
48
-
49
-
50
-
51
-
 52
52 -
 53
53 -
 54
54 -
 55
55 -
 56
56 -
 57
57 -
 58
58 -
 59
59 -
 60
60 -
 61
61 -
 62
62 -
63
-
64
-
65
-
66
-
67
-
68
-
69
-
70
-
71
-
72
-
73
-
74
 |
 |