IBM 306m User Guide - Page 43
Updating, server, configuration
 |
UPC - 000435867605
View all IBM 306m manuals
Add to My Manuals
Save this manual to your list of manuals |
Page 43 highlights
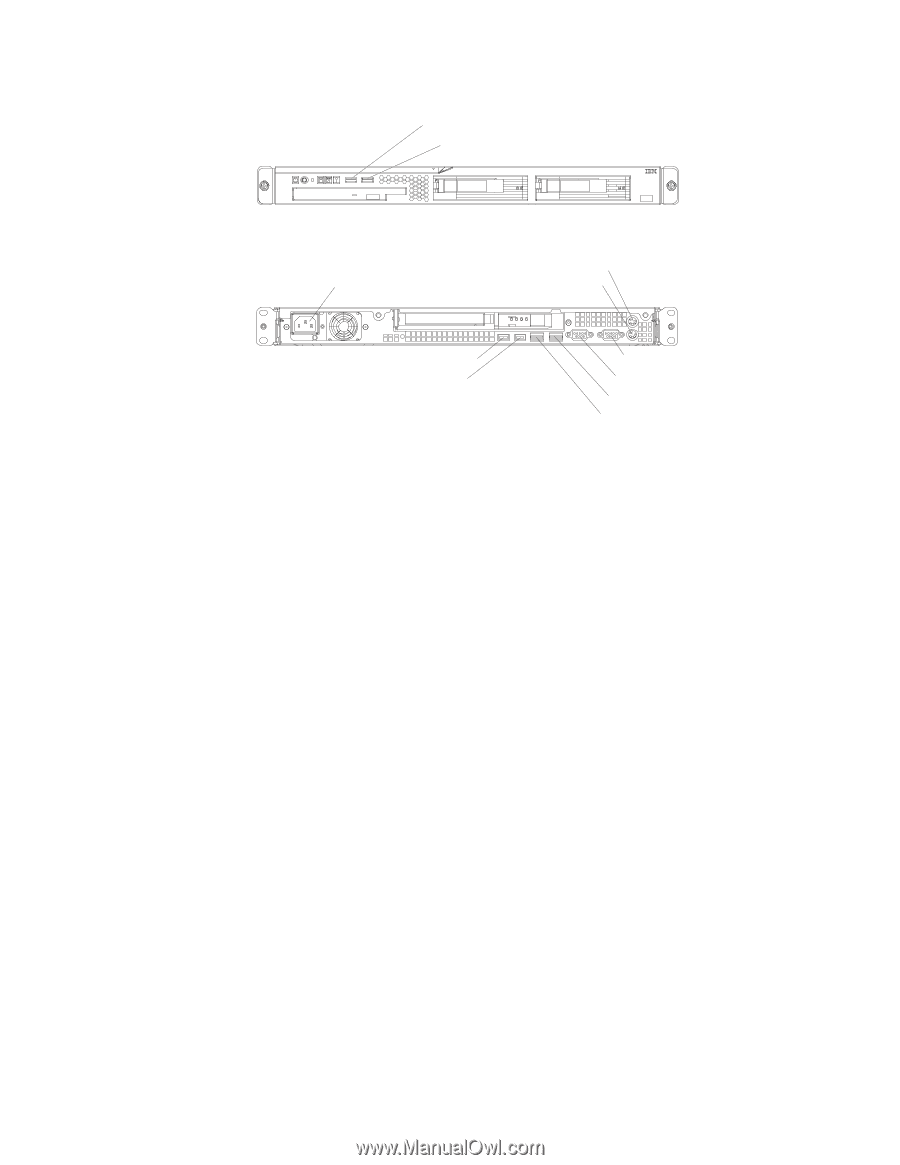
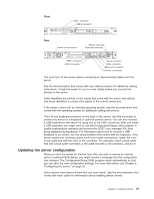
Front USB 1 connector USB 2 connector Rear Power-cord connector Mouse connector Keyboard connector USB 1 connector USB 2 connector Serial connector Video connector Ethernet 2 connector Ethernet 1 connector You must turn off the server before connecting or disconnecting cables from the server. See the documentation that comes with any external devices for additional cabling instructions. It might be easier for you to route cables before you connect the devices to the server. Cable identifiers are printed on the cables that come with the server and options. Use these identifiers to connect the cables to the correct connectors. If the server comes with an installed operating system, see the documentation that comes with the operating system for additional cabling instructions. There is one keyboard connector on the back of the server. Use this connector to connect the server to a keyboard or optional console switch. You can also connect a USB keyboard to the server by using one of the USB connectors. After you install a USB keyboard, you might have to use the Configuration/Setup Utility program to enable keyboardless operation and prevent the POST error message 301 from being displayed during startup. For information about how to connect a USB keyboard to the server, see the documentation that comes with the keyboard. If the server cables and connector panel have color-coded connections, match the color of the cable end with the color of the connector. For example, match a blue cable end with a blue panel connector, a red cable end with a red connector, and so on. Updating the server configuration When you start the server for the first time after you add or remove an internal option or external SAS device, you might receive a message that the configuration has changed. The Configuration/Setup Utility program starts automatically so that you can save the new configuration settings. For more information, see Chapter 3, "Configuring the server," on page 33. Some options have device drivers that you must install. See the documentation that comes with each option for information about installing device drivers. Chapter 2. Installing options 31
-
 1
1 -
2
-
3
-
4
-
5
-
6
-
7
-
8
-
9
-
10
-
11
-
12
-
13
-
14
-
15
-
16
-
17
-
18
-
19
-
20
-
21
-
22
-
23
-
24
-
25
-
26
-
27
-
28
-
29
-
30
-
31
-
32
-
33
-
34
-
35
-
36
-
37
-
 38
38 -
 39
39 -
 40
40 -
 41
41 -
 42
42 -
 43
43 -
 44
44 -
 45
45 -
 46
46 -
 47
47 -
 48
48 -
49
-
50
-
51
-
52
-
53
-
54
-
55
-
56
-
57
-
58
-
59
-
60
-
61
-
62
-
63
-
64
-
65
-
66
-
67
-
68
-
69
-
70
-
71
-
72
-
73
-
74
 |
 |