IBM 306m User Guide - Page 52
Administrator, password, Resetting, passwords
 |
UPC - 000435867605
View all IBM 306m manuals
Add to My Manuals
Save this manual to your list of manuals |
Page 52 highlights
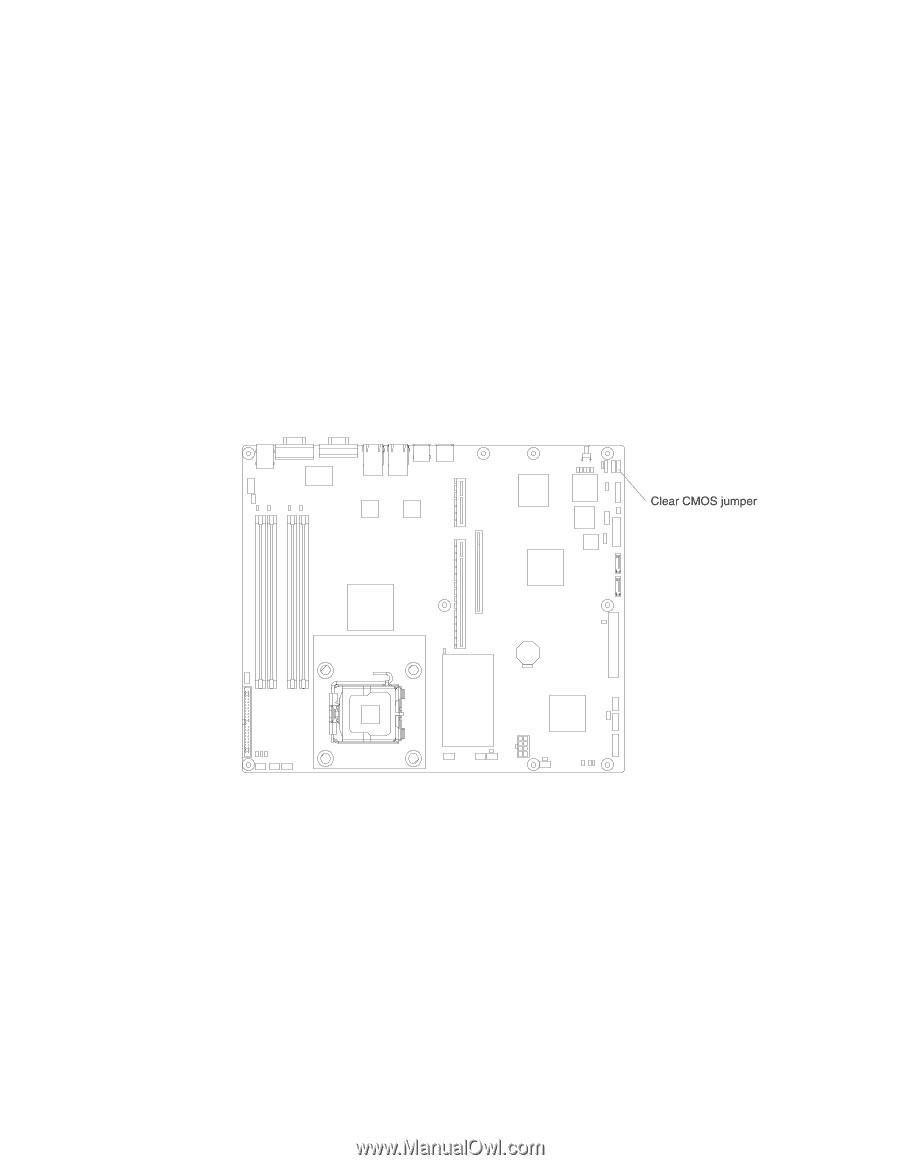
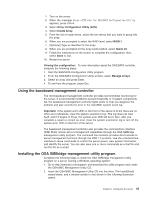
Attention: Before changing any switch settings or moving any jumpers, turn off the server; then, disconnect all power cords and external cables. See the safety information that begins on page v. Do not change settings or move jumpers on any system-board switch or jumper block that is not shown in this document. Administrator password If an administrator password is set, you must type the administrator password for access to the full Configuration/Setup Utility menu. You can use any combination of up to seven characters (A-Z, a-z, and 0-9) for the password. If you forget the administrator password, you can reset it after you change the position of the clear CMOS jumper. See "Resetting passwords" for additional information. Resetting passwords If you forget the user or administrator password, you can move the clear-CMOS jumper block on the system board to pins 2 and 3, to clear CMOS memory and bypass the power-on or administrator password check. The jumper location is shown in the following illustration. To clear CMOS and reset the passwords, complete the following steps: 1. Review the safety information that begins on page v. 2. Turn off the server and peripheral devices and disconnect all power cords and external cables. 3. Remove the server from the rack and place it on a flat, non-conductive surface. 4. Remove the cover. See "Removing the cover" on page 18 for instructions. 5. Remove the riser-card assembly. See "Installing an adapter" on page 19 for instructions. 6. Move the clear-CMOS jumper block from pins 1 and 2 to pins 2 and 3. 7. Install the riser-card assembly and the cover and connect the server to a keyboard, monitor, and mouse; then, connect the server to a power source. 8. Turn on the server. You can now start the Configuration/Setup Utility program and either delete the old password or set a new power-on or administrator password. 40 IBM xSeries 306m Types 8849 and 8491: User's Guide
-
 1
1 -
2
-
3
-
4
-
5
-
6
-
7
-
8
-
9
-
10
-
11
-
12
-
13
-
14
-
15
-
16
-
17
-
18
-
19
-
20
-
21
-
22
-
23
-
24
-
25
-
26
-
27
-
28
-
29
-
30
-
31
-
32
-
33
-
34
-
35
-
36
-
37
-
38
-
39
-
40
-
41
-
42
-
43
-
44
-
45
-
46
-
 47
47 -
 48
48 -
 49
49 -
 50
50 -
 51
51 -
 52
52 -
 53
53 -
 54
54 -
 55
55 -
 56
56 -
 57
57 -
58
-
59
-
60
-
61
-
62
-
63
-
64
-
65
-
66
-
67
-
68
-
69
-
70
-
71
-
72
-
73
-
74
 |
 |