IBM 306m User Guide - Page 41
Replacing, riser-card, assembly
 |
UPC - 000435867605
View all IBM 306m manuals
Add to My Manuals
Save this manual to your list of manuals |
Page 41 highlights
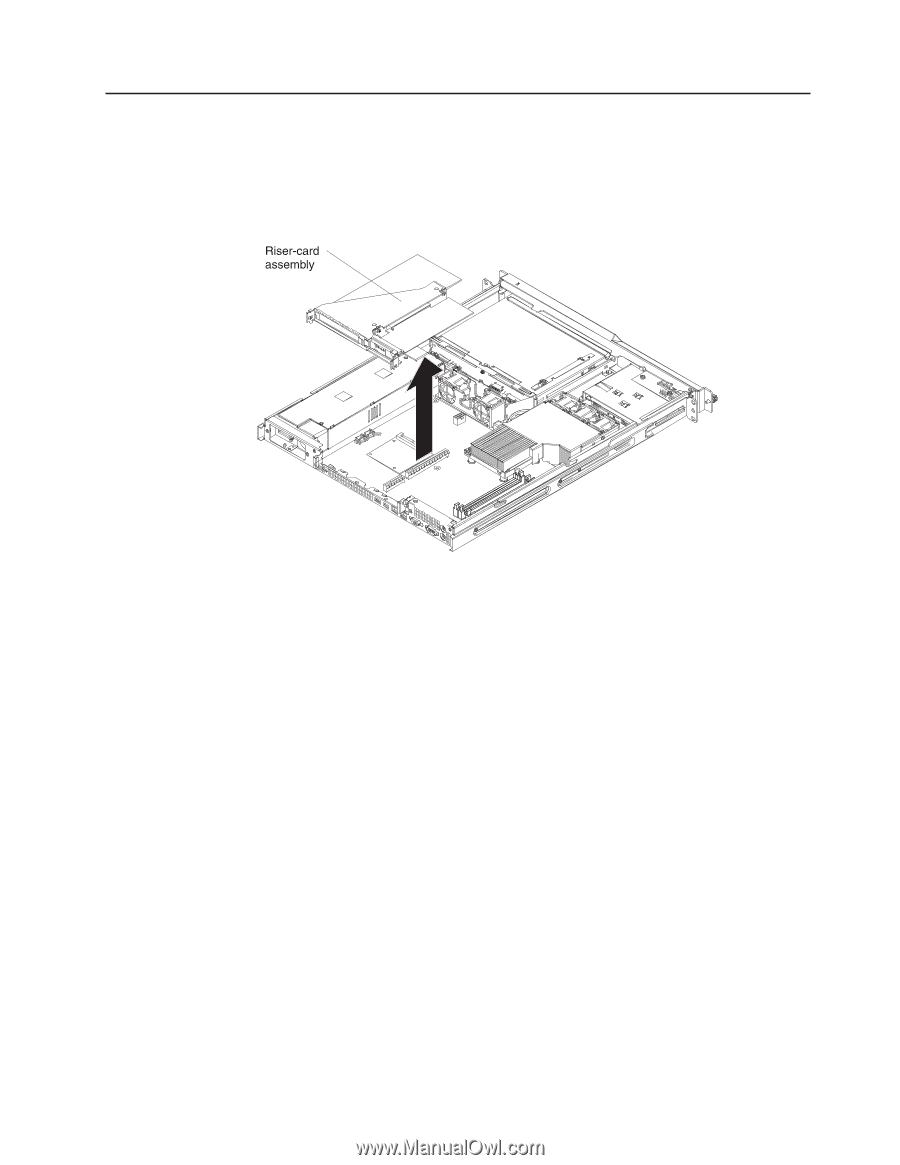
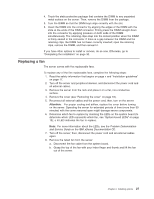
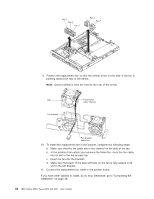
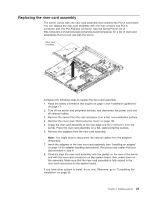
Replacing the riser-card assembly The server comes with one riser-card assembly that contains two PCI-X connectors. You can replace the riser-card assembly with one that contains one PCI-X connector and one PCI Express connector. See the ServerProven list at http://www.ibm.com/servers/eserver/serverproven/compat/us/ for a list of riser-card assemblies that you can use with the server. Complete the following steps to replace the riser-card assembly. 1. Read the safety information that begins on page v and "Installation guidelines" on page 17. 2. Turn off the server and peripheral devices, and disconnect the power cord and all external cables. 3. Remove the server from the rack and place it on a flat, non-conductive surface. 4. Remove the cover (see "Removing the cover" on page 18). 5. Grasp the riser-card assembly at the rear edge and lift to remove it from the server. Place the riser-card assembly on a flat, static-protective surface. 6. Remove the adapters from the riser-card assembly. Note: You might have to disconnect the internal cables from the adapters temporarily. 7. Insert the adapters in the new riser-card assembly (see "Installing an adapter" on page 19 for adapter-handling instructions). Reconnect any cables that you disconnected in step 6. 8. Carefully align the riser-card assembly with the guides on the rear of the server and with the riser-card connectors on the system board; then, press down on the assembly. Make sure that the riser-card assembly is fully seated in the riser-card connectors on the system board. If you have other options to install, do so now. Otherwise, go to "Completing the installation" on page 30. Chapter 2. Installing options 29
-
 1
1 -
2
-
3
-
4
-
5
-
6
-
7
-
8
-
9
-
10
-
11
-
12
-
13
-
14
-
15
-
16
-
17
-
18
-
19
-
20
-
21
-
22
-
23
-
24
-
25
-
26
-
27
-
28
-
29
-
30
-
31
-
32
-
33
-
34
-
35
-
 36
36 -
 37
37 -
 38
38 -
 39
39 -
 40
40 -
 41
41 -
 42
42 -
 43
43 -
 44
44 -
 45
45 -
 46
46 -
47
-
48
-
49
-
50
-
51
-
52
-
53
-
54
-
55
-
56
-
57
-
58
-
59
-
60
-
61
-
62
-
63
-
64
-
65
-
66
-
67
-
68
-
69
-
70
-
71
-
72
-
73
-
74
 |
 |