Icom MR-1220 Instruction Manual - Page 62
Adjusting the sweep timing, Setting the selectable display ranges, Saving or loading the settings
 |
View all Icom MR-1220 manuals
Add to My Manuals
Save this manual to your list of manuals |
Page 62 highlights
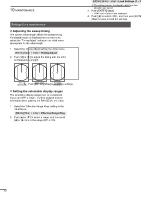
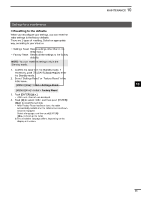
10 Maintenance Settings for a maintenance DDAdjusting the sweep timing The system cable length affects the sweep timing. If a straight target is displayed as a curved echo, adjust the "Timing Adjust" setting in the Initial menu appropriate for the cable length. 1. Select the Timing Adjust setting the Initial menu. [MENU]/[ ] > Initial > Timing Adjust 2. Push [◄] or [►] to adjust the timing until the echo is displayed as straight. Too low Appropriate (Narrowed) Too high (Widened) DDSetting the selectable display ranges The selectable display ranges can be customized. If you turn OFF a range, it will be skipped and not selectable when pushing the RANGE/ [+] or [-] key. 1. Select the "Effective Range Ring" setting in the Initial Menu. [MENU]/[ ] > Initial > Effective Range Ring 2. Push [▲] or [▼] to select a range, and then push [◄] or [►] to turn the range OFF or ON. DDSaving or loading the settings The radar can save three different settings for different operators or different situations, and immediately change from one to another. You can save or load the settings other than the Initial menu. 1. Confirm the radar is in the Standby mode, if necessary, push [TX (SAVE)]/[ ] to enter the Standby mode. 2. Select either of the "Save setting (1 ~ 3)" that you want to save the setting to in the Initial menu. When you load the saved settings, select from "Load Setting (1 ~ 3)." [MENU]/[ ] > Initial > Save Settings (1 ~ 3) [MENU]/[ ] > Initial > Load Settings (1 ~ 3) LLThe setting number displayed in bold face has already been saved. 3. Push [ENTER OK> and are displayed. 4. Push [◄] to select , and then push [ENTER]/ [ ] to save or load the settings. 3. Push [ENTER]/[ ] to apply the settings. 57
-
 1
1 -
2
-
3
-
4
-
5
-
6
-
7
-
8
-
9
-
10
-
11
-
12
-
13
-
14
-
15
-
16
-
17
-
18
-
19
-
20
-
21
-
22
-
23
-
24
-
25
-
26
-
27
-
28
-
29
-
30
-
31
-
32
-
33
-
34
-
35
-
36
-
37
-
38
-
39
-
40
-
41
-
42
-
43
-
44
-
45
-
46
-
47
-
48
-
49
-
50
-
51
-
52
-
53
-
54
-
55
-
56
-
 57
57 -
 58
58 -
 59
59 -
 60
60 -
 61
61 -
 62
62 -
 63
63 -
 64
64 -
 65
65 -
 66
66 -
 67
67 -
68
-
69
-
70
-
71
-
72
-
73
-
74
-
75
-
76
-
77
-
78
-
79
-
80
 |
 |
