Intel D865GLC Manual - Page 41
Upgrading the CPU
 |
UPC - 683728198374
View all Intel D865GLC manuals
Add to My Manuals
Save this manual to your list of manuals |
Page 41 highlights
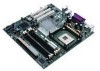
Upgrading the CPU CAUTION! Allow time for the processor and heatsink to cool before touching either of them. The Pentium 4 processor together with Level 2 cache chips are housed in a protective package. The design of the D865GLC computer makes it a simple job to replace or upgrade the processor. To do so please refer to figure 15 and follow the instructions below: 1. Read the warnings at the start of this chapter and ensure a static free environment 2. Remove the lid from the computer by removing the four screws at the rear of the case 3. Locate the CPU module by referring to figure 1 if necessary 4. Locate the heat sink clips, and remove heat sink (and unplug FAN cable) 5. Lift arm on Socket to release the CPU 6. Lift the CPU Vertically upwards until it is clear of the socket You can now fit the replacement CPU and heat sink into the socket. Figure 15: Installing the CPU heatsink (note heatsink type may vary from one shown above) D865GLC Motherboard Manual 40
-
 1
1 -
2
-
3
-
4
-
5
-
6
-
7
-
8
-
9
-
10
-
11
-
12
-
13
-
14
-
15
-
16
-
17
-
18
-
19
-
20
-
21
-
22
-
23
-
24
-
25
-
26
-
27
-
28
-
29
-
30
-
31
-
32
-
33
-
34
-
35
-
 36
36 -
 37
37 -
 38
38 -
 39
39 -
 40
40 -
 41
41 -
 42
42 -
 43
43 -
 44
44 -
 45
45 -
 46
46 -
47
-
48
-
49
-
50
-
51
-
52
-
53
-
54
-
55
-
56
-
57
-
58
-
59
-
60
-
61
-
62
-
63
-
64
-
65
-
66
-
67
-
68
-
69
-
70
-
71
-
72
-
73
-
74
-
75
-
76
-
77
-
78
-
79
-
80
-
81
-
82
-
83
-
84
-
85
-
86
-
87
-
88
-
89
-
90
-
91
-
92
-
93
-
94
-
95
-
96
-
97
-
98
-
99
-
100
-
101
-
102
-
103
-
104
-
105
-
106
-
107
-
108
-
109
 |
 |
