Kodak I840 User Guide - Page 40
The Patch Reader, Slide the green ink cartridge carrier out of its slot.
 |
UPC - 041778263082
View all Kodak I840 manuals
Add to My Manuals
Save this manual to your list of manuals |
Page 40 highlights
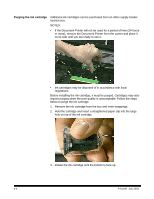
Setting the printer position There are 13 possible positions for the printer. Make sure that the printer is in the correct position for your documents. 1. Open the swing out door. 2. Locate the printer positioning slots. 3. Determine which position is suitable for your printing needs. 4. Slide the green ink cartridge carrier out of its slot. 5. Slide the green ink cartridge carrier into the desired slot. IMPORTANT: The printer cable should always be kept in place by the white clip to prevent the cable from interfering with the imaging path. 6. Close the swing out door. A-61169 July 2003 4-9
-
 1
1 -
2
-
3
-
4
-
5
-
6
-
7
-
8
-
9
-
10
-
11
-
12
-
13
-
14
-
15
-
16
-
17
-
18
-
19
-
20
-
21
-
22
-
23
-
24
-
25
-
26
-
27
-
28
-
29
-
30
-
31
-
32
-
33
-
34
-
 35
35 -
 36
36 -
 37
37 -
 38
38 -
 39
39 -
 40
40 -
 41
41 -
 42
42 -
 43
43 -
 44
44 -
 45
45 -
46
-
47
-
48
-
49
-
50
-
51
-
52
-
53
-
54
-
55
-
56
-
57
-
58
-
59
-
60
-
61
-
62
-
63
-
64
-
65
-
66
-
67
-
68
-
69
-
70
-
71
-
72
-
73
-
74
-
75
-
76
-
77
-
78
-
79
-
80
-
81
-
82
-
83
 |
 |

A-61169 July 2003
4-9
Setting the printer
position
There are 13 possible positions for the printer. Make sure that the printer
is in the correct position for your documents.
1. Open the swing out door.
2. Locate the printer positioning slots.
3.
Determine which position is suitable for your printing needs.
4.
Slide the green ink cartridge carrier out of its slot.
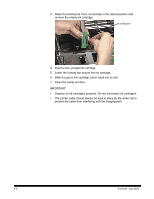
5.
Slide the green ink cartridge carrier into the desired slot.
IMPORTANT:
The printer cable should always be kept in place by the
white clip to prevent the cable from interfering with the
imaging path.
6. Close the swing out door.