Konica Minolta C83hc High Chroma GBC PUNCH G2 User Manual - Page 7
User Display
 |
View all Konica Minolta C83hc High Chroma manuals
Add to My Manuals
Save this manual to your list of manuals |
Page 7 highlights
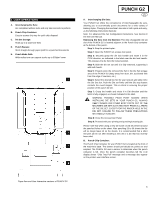
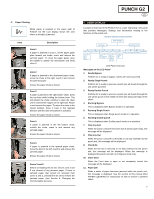
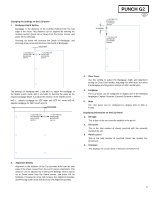
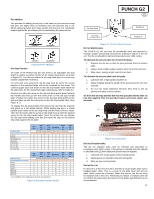
C. Paper Clearing: When paper is jammed in the paper path of PUNCH G2 the LCD display shows the area where a sheet(s) is jammed. Area Description Zone 1 If paper is jammed in Zone 1, lift the paper guide plate located just inside, reach and remove the jammed paper. To close the paper guide, raise the handle to unlatch the mechanism and firmly close it. Zone 2 If paper is jammed in the downward paper chute, move the chute to the right, reach in and remove the jammed paper. Ensure the paper chute is closed. Zone 3 If paper is jammed in the right bottom chute, press the top lever while holding the bottom lever. This will unlatch the chute; continue to open the chute until it reached the magnet on the right side. Reach in and remove the paper. To return the chute to the closed position, move it back in the opposite direction until the latch mechanism is activated. Ensure the paper chute is closed. Zone 5 If paper is jammed in the left bottom chute, unlatch the chute, reach in and remove any jammed paper. Ensure the paper chute is closed. Zone 6 If paper is jammed in the upward paper chute, move the door to the left, reach in and remove the jammed paper. Ensure the paper chute is closed. Zones 3 and 5 Before uninstalling the die set, ensure zone 3 and 5 are cleared of any jammed paper. If there is jammed paper that cannot be removed from zones 3 and 5, uninstall the die set to remove the jammed paper. (see Section 4. Changing the Interchangable die sets). PUNCH G2 EN 5. USER DISPLAY Located on the front of the PUNCH G2 is a user interactive LCD panel that provides Messages; Settings and Information relating to the functions of the punch unit. LCD User Interface Screen Overview MAIN SCREEN SETTINGS INFORMATION BACKGAGE ALIGNMENT CLEAR COVER LANGUAGE UNITS Options: TRAIL MID L MID XL Options: CC BACKGAGE CC ALIGMENT Options: DEUTSCH ENGLISH ESPANOL FRANCAIS ITALIANO Options: MM IN DIE TYPE DIE CYCLES PUNCH CYCLES FIRMWARE LCD Panel Overview Messages on the LCD Panel 1. Ready Bypass PUNCH G2 is ready to bypass, sheets will not be punched. 2. Ready Single Punch PUNCH G2 is ready to process a punch job, all sheets through the unit will be punched. 3. Ready Double Punch PUNCH G2 is ready to process a punch job, all sheets through the unit will be punch in the middle of sheet and along trail edge of the sheet. 4. Running Bypass This is displayed when Bypass mode is in operation. 5. Running Single Punch This is displayed when Single punch mode is in operation. 6. Running Double punch This is displayed when Double punch mode is in operation. 7. Chip tray Full When the punch container becomes full of waste paper chips, this message will be displayed. 8. Chip tray Out When the punch container is removed or not fully inserted into the punch unit, this message will be displayed. 9. Check die When the Die Set is removed or not fully inserted into the punch unit, this message will be displayed. When this message is displayed the punch unit will run in Bypass mode only. 10. Close Door When the Front door is open or not completely closed this message will be displayed. 11. Paper jam When a sheet of paper becomes jammed within the punch unit, this message is displayed. See the section of this manual titled PAPER CLEARING for instructions on how to remove a jammed sheet. 7
-
 1
1 -
 2
2 -
 3
3 -
 4
4 -
 5
5 -
 6
6 -
 7
7 -
 8
8 -
 9
9 -
 10
10 -
 11
11 -
 12
12 -
13
-
14
-
15
-
16
-
17
-
18
-
19
-
20
-
21
-
22
-
23
-
24
-
25
-
26
-
27
-
28
-
29
-
30
-
31
-
32
-
33
-
34
-
35
-
36
-
37
-
38
-
39
-
40
-
41
-
42
-
43
-
44
-
45
-
46
-
47
-
48
-
49
-
50
-
51
-
52
-
53
-
54
-
55
-
56
-
57
-
58
-
59
-
60
-
61
-
62
-
63
-
64
-
65
-
66
-
67
-
68
-
69
-
70
-
71
-
72
-
73
-
74
-
75
-
76
-
77
-
78
-
79
-
80
-
81
-
82
-
83
-
84
-
85
-
86
-
87
-
88
-
89
-
90
-
91
-
92
 |
 |
