Konica Minolta Fujitsu fi-7180 Operation Guide - Page 115
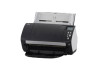
Ultrasonic sensor × 2/Document sensor × 8, Feed roller × 2/Eject roller × 2, Ultrasonic sensor
 |
View all Konica Minolta Fujitsu fi-7180 manuals
Add to My Manuals
Save this manual to your list of manuals |
Page 115 highlights
Chapter 6 Daily Care Ultrasonic sensor (× 2)/Document sensor (× 8) Gently wipe the dirt and dust off the surface of the ultrasonic/document sensors. HINT If it is difficult to clean, use a cotton swab. Ultrasonic sensor Document sensor Feed roller (× 2)/Eject roller (× 2) The power must be turned on to rotate the feed/eject rollers. 1 Turn on the scanner. For details, refer to "1.3 Turning the Power ON/OFF" (page 25). The [Ready] screen is displayed on the LCD. 2 Press the [Menu] button. The [Settings Menu] screen is displayed on the LCD. 3 Press the [] or [] button and select [2: Cleaning], then press the [Scan/Enter] button to confirm. The [Cleaning] screen is displayed on the LCD. 4 Press the [] or [] button and select [2: Roller Wipe], then press the [Scan/Enter] button to confirm. A message is displayed on the LCD. ATTENTION Do not perform scanning from the scanner driver during cleaning. 5 Open the ADF. For details, refer to "1.4 Opening/Closing the ADF" (page 27). When opening, the ADF might close accidentally. Be careful not to have your fingers caught when the ADF closes. TOP Contents Index Introduction Scanner Overview How to Load Documents Configuring the Scan Settings How to Use the Operator Panel Various Ways to Scan Daily Care Replacing the Consumables Troubleshooting Operational Settings Appendix Glossary 115
-
 1
1 -
2
-
3
-
4
-
5
-
6
-
7
-
8
-
9
-
10
-
11
-
12
-
13
-
14
-
15
-
16
-
17
-
18
-
19
-
20
-
21
-
22
-
23
-
24
-
25
-
26
-
27
-
28
-
29
-
30
-
31
-
32
-
33
-
34
-
35
-
36
-
37
-
38
-
39
-
40
-
41
-
42
-
43
-
44
-
45
-
46
-
47
-
48
-
49
-
50
-
51
-
52
-
53
-
54
-
55
-
56
-
57
-
58
-
59
-
60
-
61
-
62
-
63
-
64
-
65
-
66
-
67
-
68
-
69
-
70
-
71
-
72
-
73
-
74
-
75
-
76
-
77
-
78
-
79
-
80
-
81
-
82
-
83
-
84
-
85
-
86
-
87
-
88
-
89
-
90
-
91
-
92
-
93
-
94
-
95
-
96
-
97
-
98
-
99
-
100
-
101
-
102
-
103
-
104
-
105
-
106
-
107
-
108
-
109
-
 110
110 -
 111
111 -
 112
112 -
 113
113 -
 114
114 -
 115
115 -
 116
116 -
 117
117 -
 118
118 -
 119
119 -
 120
120 -
121
-
122
-
123
-
124
-
125
-
126
-
127
-
128
-
129
-
130
-
131
-
132
-
133
-
134
-
135
-
136
-
137
-
138
-
139
-
140
-
141
-
142
-
143
-
144
-
145
-
146
-
147
-
148
-
149
-
150
-
151
-
152
-
153
-
154
-
155
-
156
-
157
-
158
-
159
-
160
-
161
-
162
-
163
-
164
-
165
-
166
-
167
-
168
-
169
-
170
-
171
-
172
-
173
-
174
-
175
-
176
-
177
-
178
-
179
-
180
-
181
-
182
-
183
-
184
-
185
-
186
-
187
-
188
-
189
-
190
-
191
-
192
-
193
-
194
-
195
-
196
-
197
-
198
-
199
-
200
-
201
-
202
-
203
-
204
-
205
-
206
-
207
-
208
-
209
-
210
-
211
-
212
-
213
-
214
-
215
-
216
-
217
-
218
-
219
-
220
-
221
-
222
-
223
-
224
-
225
-
226
-
227
-
228
-
229
-
230
 |
 |
