Konica Minolta Fujitsu fi-7180 Operation Guide - Page 91
Scanning Photographs and Clippings, the Carrier Sheet.
 |
View all Konica Minolta Fujitsu fi-7180 manuals
Add to My Manuals
Save this manual to your list of manuals |
Page 91 highlights
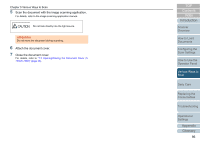
Chapter 5 Various Ways to Scan Scanning Photographs and Clippings Using the Carrier Sheet allows you to scan documents that can be damaged quite easily such as photographs, or documents that are difficult to load directly such as newspaper clippings. 1 Place the document inside the Carrier Sheet. Place it against the top center of the Carrier Sheet. 2 Load the Carrier Sheet face-down in the ADF paper chute (feeder), as shown below. Secure the Carrier Sheet with the side guides to avoid skewing. TOP Contents Index Introduction Scanner Overview Back How to Load Documents Configuring the Scan Settings 3 In the scanner driver, configure the scan settings for using the Carrier Sheet. For details, refer to the scanner driver's Help. 4 Scan the document with the image scanning application. For details, refer to the image scanning application manual. ATTENTION The image is output at the center of the page in the size specified in [Paper Size]. When [Automatic detection] is specified for [Paper Size], the closest standard size is selected from the same drop-down list. Note that the size of the image may become smaller than the original document depending on the document scanned, or part of the image may appear missing. Example: When an A5 size image is printed in the center of an A4 size document The image is output in A5 size. To output the scanned image in the actual size of the document, specify the document size for [Paper size]. How to Use the Operator Panel Various Ways to Scan Daily Care Replacing the Consumables Troubleshooting Operational Settings Appendix Glossary 91
-
 1
1 -
2
-
3
-
4
-
5
-
6
-
7
-
8
-
9
-
10
-
11
-
12
-
13
-
14
-
15
-
16
-
17
-
18
-
19
-
20
-
21
-
22
-
23
-
24
-
25
-
26
-
27
-
28
-
29
-
30
-
31
-
32
-
33
-
34
-
35
-
36
-
37
-
38
-
39
-
40
-
41
-
42
-
43
-
44
-
45
-
46
-
47
-
48
-
49
-
50
-
51
-
52
-
53
-
54
-
55
-
56
-
57
-
58
-
59
-
60
-
61
-
62
-
63
-
64
-
65
-
66
-
67
-
68
-
69
-
70
-
71
-
72
-
73
-
74
-
75
-
76
-
77
-
78
-
79
-
80
-
81
-
82
-
83
-
84
-
85
-
 86
86 -
 87
87 -
 88
88 -
 89
89 -
 90
90 -
 91
91 -
 92
92 -
 93
93 -
 94
94 -
 95
95 -
 96
96 -
97
-
98
-
99
-
100
-
101
-
102
-
103
-
104
-
105
-
106
-
107
-
108
-
109
-
110
-
111
-
112
-
113
-
114
-
115
-
116
-
117
-
118
-
119
-
120
-
121
-
122
-
123
-
124
-
125
-
126
-
127
-
128
-
129
-
130
-
131
-
132
-
133
-
134
-
135
-
136
-
137
-
138
-
139
-
140
-
141
-
142
-
143
-
144
-
145
-
146
-
147
-
148
-
149
-
150
-
151
-
152
-
153
-
154
-
155
-
156
-
157
-
158
-
159
-
160
-
161
-
162
-
163
-
164
-
165
-
166
-
167
-
168
-
169
-
170
-
171
-
172
-
173
-
174
-
175
-
176
-
177
-
178
-
179
-
180
-
181
-
182
-
183
-
184
-
185
-
186
-
187
-
188
-
189
-
190
-
191
-
192
-
193
-
194
-
195
-
196
-
197
-
198
-
199
-
200
-
201
-
202
-
203
-
204
-
205
-
206
-
207
-
208
-
209
-
210
-
211
-
212
-
213
-
214
-
215
-
216
-
217
-
218
-
219
-
220
-
221
-
222
-
223
-
224
-
225
-
226
-
227
-
228
-
229
-
230
 |
 |
