Konica Minolta PS5000C Operation Manual - Page 45
Image Mode, Resolution, Exposure, Image Quality, Scan button, Tone Curve, Sharpness
 |
View all Konica Minolta PS5000C manuals
Add to My Manuals
Save this manual to your list of manuals |
Page 45 highlights
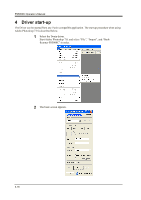
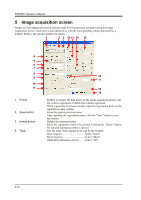
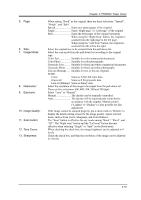
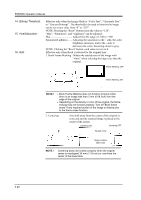
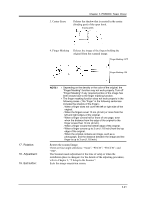
5. Page: 6. Size: 7. Image Mode: 8. Resolution: 9. Exposure: 10. Image Quality: 11. Scan button: 12. Tone Curve: 13. Sharpness: Chapter 3 PS5000C Twain Driver When setting "Book" as the original, there are three selections: "Spread", "Single", and "Split". Spread Scans two spread pages of the original Single Scans "Right page" or "Left page" of the original. Split Scans the both pages of the original separately. When using the "Right Scan" button, the original is scanned from the right page to the left page. When using the "Left Scan" button, the original is scanned from the left to the right. Select the original size to be scanned from the pull-down list. Select the scan mode from the pull-down list according to the original type. Color Text Suitable for color commercial documents. Color Photo Suitable for color photographs. Grayscale Text........... Suitable for black and white commercial documents. Grayscale Photo ........ Suitable for black and white photographs. Line art (Bitmap)....... Suitable for text or line art originals. NOTE: Color: Scans as 24 bit full color data. Grayscale: Scans as 8 bit grayscale data. Line art (Bitmap): Scans as binary data. Select the resolution of the image to be output from the pull-down list. There are five selections: 600, 400, 300, 240 and 200 (dpi). Select "Auto" or "Manual". Manual The density can be manually controlled. Auto The density will be automatically controlled in accordance with the original. Manual control ("Lighten" to "Darken") is also possible for fine adjustment. If the image cannot be scanned properly, put a check mark in "Details" to display the details setting screen for the image quality. Adjust relevant items, such as Tone Curve, Sharpness, and Color Balance. The "Scan" button is effective for any mode among "Book", "Sheet", and "3D". The "Right scan" button and the "Left scan" button become effective when selecting "Single" or "Split" on the Book mode. When checking the check box, the image brightness can be adjusted in 9 levels. Check the check box, and then the resolution of the image can be adjusted in 5 levels. 3-19
-
 1
1 -
2
-
3
-
4
-
5
-
6
-
7
-
8
-
9
-
10
-
11
-
12
-
13
-
14
-
15
-
16
-
17
-
18
-
19
-
20
-
21
-
22
-
23
-
24
-
25
-
26
-
27
-
28
-
29
-
30
-
31
-
32
-
33
-
34
-
35
-
36
-
37
-
38
-
39
-
 40
40 -
 41
41 -
 42
42 -
 43
43 -
 44
44 -
 45
45 -
 46
46 -
 47
47 -
 48
48 -
 49
49 -
 50
50 -
51
-
52
-
53
-
54
-
55
-
56
-
57
-
58
-
59
-
60
-
61
-
62
-
63
-
64
-
65
-
66
-
67
-
68
-
69
-
70
-
71
-
72
-
73
-
74
-
75
-
76
 |
 |