Kyocera TASKalfa 620 TASKalfa 620/820 Print Driver Users Guide Rev 8.1 - Page 43
Printing a Poster, Sheets per Units, Printers and Faxes, Properties, Device Settings
 |
View all Kyocera TASKalfa 620 manuals
Add to My Manuals
Save this manual to your list of manuals |
Page 43 highlights
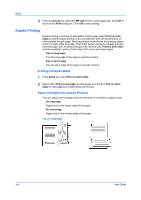
Layout Note: The Sheets per page displays the unit of measurement in inches or millimeters. To change the Units setting, open the Printers and Faxes folder, right-click your printer. Click Properties > Device Settings > User. Use Poster Settings to select options, in any combination to make it easier to create a poster. These options print visual cues on the poster sheets that provide help in cropping and assembling the pages. Overlap edges This selection duplicates the edges of document data on adjoining sheets. Poster appearance is improved when the edges overlap slightly. Select the check box, then type or select a value between 0.00 and 1.20 inches (0.0 and 30.4 mm). This option reduces the final poster size slightly. Print crop marks This selection prints a border at the edges of each poster sheet. You can crop each sheet on the border before assembling the sheets. This option ensures that data on adjoining sheets matches precisely. Print assembly marks This selection prints numbers at the edges of each sheet, matching numbers on adjoining sheets. Assemble each sheet edge to the same numbered edge on another sheet. Use Print format to print a proof sheet, along with the poster, to guide you in assembling the printed poster sheets. Poster pages This selection prints all of the sheets to be assembled as a poster. Proof sheet This selection prints all the poster pages on one sheet with markings that display the sheet assembly. Poster pages and proof sheet This selection prints all poster sheets and a one-page proof sheet. Printing a Poster To print a poster or banner, follow these steps: 1 In the Layout tab, select Poster. 2 In Sheets per page, select the poster size. Each option describes the number of sheets it takes to represent one finished poster page. 3 Click Poster Settings to select options in any combination. These options ensure a precise reassembly of the pages to create the poster. 4 In Print format, select one of the options for a finished print format. 5 Click OK to return to the Print dialog box. 6 Click OK to begin printing. KX Driver 5-3
-
 1
1 -
2
-
3
-
4
-
5
-
6
-
7
-
8
-
9
-
10
-
11
-
12
-
13
-
14
-
15
-
16
-
17
-
18
-
19
-
20
-
21
-
22
-
23
-
24
-
25
-
26
-
27
-
28
-
29
-
30
-
31
-
32
-
33
-
34
-
35
-
36
-
37
-
 38
38 -
 39
39 -
 40
40 -
 41
41 -
 42
42 -
 43
43 -
 44
44 -
 45
45 -
 46
46 -
 47
47 -
 48
48 -
49
-
50
-
51
-
52
-
53
-
54
-
55
-
56
-
57
-
58
-
59
-
60
-
61
-
62
-
63
-
64
-
65
-
66
-
67
-
68
-
69
-
70
-
71
-
72
-
73
-
74
-
75
-
76
-
77
-
78
-
79
-
80
-
81
-
82
-
83
-
84
-
85
-
86
-
87
-
88
-
89
-
90
-
91
-
92
-
93
-
94
-
95
 |
 |
