Lenovo E200 Hardware Maintenance Manual (HMM) - 3000 E200 (type 7848) - Page 110
Replacing, drive
 |
View all Lenovo E200 manuals
Add to My Manuals
Save this manual to your list of manuals |
Page 110 highlights
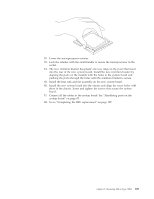
Replacing a hard disk drive Attention Do not open your computer or attempt any repair before reading and understanding the "Important safety information" in the ThinkCentre Safety and Warranty Guide that came with your computer. To obtain a copy of the ThinkCentre Safety and Warranty Guide, go to: http://www.lenovo.com/support Important When you install a new hard disk drive, you also need a set of Product Recovery discs. The set of Product Recovery discs will enable the contents of the hard disk to be restored to the same state as when the computer was originally shipped from the factory. For more information on recovering factory-installed software, refer to "Recovering software" in the User Guide. 1. Remove the covers. See "Removing the computer cover" on page 86. 2. Disconnect the signal and power cables from the rear of the hard disk drive. 3. Remove the four screws that secure the hard disk drive from the drive bay. 4. Slide the drive toward the rear of the chassis until it can be removed. 5. Slide the new drive into the bay until the screws holes are aligned and install the four screws into the drive bay. 6. Reconnect the signal and power cables to the rear of the hard disk drive. 7. Go to "Completing the FRU replacement" on page 107. 104 Lenovo E200 Hardware Maintenance Manual
-
 1
1 -
2
-
3
-
4
-
5
-
6
-
7
-
8
-
9
-
10
-
11
-
12
-
13
-
14
-
15
-
16
-
17
-
18
-
19
-
20
-
21
-
22
-
23
-
24
-
25
-
26
-
27
-
28
-
29
-
30
-
31
-
32
-
33
-
34
-
35
-
36
-
37
-
38
-
39
-
40
-
41
-
42
-
43
-
44
-
45
-
46
-
47
-
48
-
49
-
50
-
51
-
52
-
53
-
54
-
55
-
56
-
57
-
58
-
59
-
60
-
61
-
62
-
63
-
64
-
65
-
66
-
67
-
68
-
69
-
70
-
71
-
72
-
73
-
74
-
75
-
76
-
77
-
78
-
79
-
80
-
81
-
82
-
83
-
84
-
85
-
86
-
87
-
88
-
89
-
90
-
91
-
92
-
93
-
94
-
95
-
96
-
97
-
98
-
99
-
100
-
101
-
102
-
103
-
104
-
 105
105 -
 106
106 -
 107
107 -
 108
108 -
 109
109 -
 110
110 -
 111
111 -
 112
112 -
 113
113 -
 114
114 -
 115
115 -
116
-
117
-
118
-
119
-
120
-
121
-
122
-
123
-
124
 |
 |
