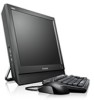
Lenovo ThinkCentre M62z Hardware Maintenance Manual (HMM) (July 2012) - ThinkC - Page 6

Additional Service, Information, Appendix A. Notices, Index, Automatic Power-On features

Page 6 highlights

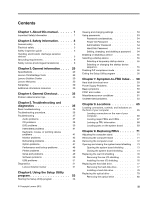
Installing an optical drive 80 Replacing the memory module 81 Removing the memory module 82 Installing a memory module 82 Replacing the microprocessor fan assembly . . . 83 Removing the microprocessor fan assembly . 83 Installing a microprocessor fan assembly . . 85 Replacing the microprocessor and heat sink assembly 86 Removing the microprocessor and heat sink assembly 87 Installing the microprocessor and heat sink assembly 88 Replacing the system board 90 Removing the system board 90 Installing a system board 91 Replacing the internal speakers 92 Removing the internal speakers 92 Installing internal speakers 92 Replacing the rear I/O assembly 93 Removing the rear I/O assembly 93 Installing a rear I/O assembly 94 Replacing the inverter 95 Removing the inverter 96 Installing an inverter 97 Replacing the battery 98 Removing the battery 98 Installing a battery 99 Replacing the power supply assembly . . . . . 99 Removing the power supply assembly . . . 99 Installing a power supply assembly . . . . . 101 Replacing the LCD panel 103 Removing the LCD panel 103 Installing an LCD panel 104 Replacing the WIFI card 105 Removing the WIFI card 105 Installing the WIFI card 106 Installing a computer wall mount 107 Completing the FRU installation 107 Installing a computer cover 108 Installing a computer stand 108 Chapter 10. Additional Service Information 111 Security features 111 Hardware controlled Passwords 111 Operating system password 111 Vital product data 111 BIOS levels 111 Flash update procedures 111 Updating (flashing) the BIOS from a disc . . . . 111 Updating (flashing) the BIOS from your operating system 112 Recovering from a POST/BIOS update failure . . 112 Power management 113 Automatic configuration and power interface (ACPI) BIOS 113 Automatic Power-On features 113 Appendix A. Notices 115 Television output notice 116 European conformance CE mark 116 Trademarks 116 Index 117 iv ThinkCentre Hardware Maintenance Manual

  • 1
  • 2
  • 3
  • 4
  • 5
  • 6
  • 7
  • 8
  • 9
  • 10
  • 11
  • 12
  • 13
  • 14
  • 15
  • 16
  • 17
  • 18
  • 19
  • 20
  • 21
  • 22
  • 23
  • 24
  • 25
  • 26
  • 27
  • 28
  • 29
  • 30
  • 31
  • 32
  • 33
  • 34
  • 35
  • 36
  • 37
  • 38
  • 39
  • 40
  • 41
  • 42
  • 43
  • 44
  • 45
  • 46
  • 47
  • 48
  • 49
  • 50
  • 51
  • 52
  • 53
  • 54
  • 55
  • 56
  • 57
  • 58
  • 59
  • 60
  • 61
  • 62
  • 63
  • 64
  • 65
  • 66
  • 67
  • 68
  • 69
  • 70
  • 71
  • 72
  • 73
  • 74
  • 75
  • 76
  • 77
  • 78
  • 79
  • 80
  • 81
  • 82
  • 83
  • 84
  • 85
  • 86
  • 87
  • 88
  • 89
  • 90
  • 91
  • 92
  • 93
  • 94
  • 95
  • 96
  • 97
  • 98
  • 99
  • 100
  • 101
  • 102
  • 103
  • 104
  • 105
  • 106
  • 107
  • 108
  • 109
  • 110
  • 111
  • 112
  • 113
  • 114
  • 115
  • 116
  • 117
  • 118
  • 119
  • 120
  • 121
  • 122
  • 123
  • 124
  • 125
  • 126

Installing an optical drive
.
.
.
.
.
.
.
.
.
80
Replacing the memory module
.
.
.
.
.
.
.
.
81
Removing the memory module
.
.
.
.
.
.
82
Installing a memory module
.
.
.
.
.
.
.
.
82
Replacing the microprocessor fan assembly .
.
.
83
Removing the microprocessor fan assembly
.
83
Installing a microprocessor fan assembly
.
.
85
Replacing the microprocessor and heat sink
assembly
.
.
.
.
.
.
.
.
.
.
.
.
.
.
.
.
.
86
Removing the microprocessor and heat sink
assembly
.
.
.
.
.
.
.
.
.
.
.
.
.
.
.
87
Installing the microprocessor and heat sink
assembly
.
.
.
.
.
.
.
.
.
.
.
.
.
.
.
88
Replacing the system board
.
.
.
.
.
.
.
.
.
90
Removing the system board
.
.
.
.
.
.
.
90
Installing a system board
.
.
.
.
.
.
.
.
.
91
Replacing the internal speakers
.
.
.
.
.
.
.
.
92
Removing the internal speakers
.
.
.
.
.
.
92
Installing internal speakers
.
.
.
.
.
.
.
.
92
Replacing the rear I/O assembly
.
.
.
.
.
.
.
.
93
Removing the rear I/O assembly
.
.
.
.
.
.
93
Installing a rear I/O assembly
.
.
.
.
.
.
.
94
Replacing the inverter
.
.
.
.
.
.
.
.
.
.
.
.
95
Removing the inverter
.
.
.
.
.
.
.
.
.
.
96
Installing an inverter
.
.
.
.
.
.
.
.
.
.
.
97
Replacing the battery
.
.
.
.
.
.
.
.
.
.
.
.
98
Removing the battery
.
.
.
.
.
.
.
.
.
.
98
Installing a battery
.
.
.
.
.
.
.
.
.
.
.
99
Replacing the power supply assembly
.
.
.
.
.
99
Removing the power supply assembly
.
.
.
99
Installing a power supply assembly
.
.
.
.
.
101
Replacing the LCD panel
.
.
.
.
.
.
.
.
.
.
.
103
Removing the LCD panel
.
.
.
.
.
.
.
.
.
103
Installing an LCD panel
.
.
.
.
.
.
.
.
.
104
Replacing the WIFI card
.
.
.
.
.
.
.
.
.
.
.
105
Removing the WIFI card
.
.
.
.
.
.
.
.
.
105
Installing the WIFI card
.
.
.
.
.
.
.
.
.
.
106
Installing a computer wall mount
.
.
.
.
.
.
.
107
Completing the FRU installation
.
.
.
.
.
.
.
.
107
Installing a computer cover
.
.
.
.
.
.
.
.
108
Installing a computer stand
.
.
.
.
.
.
.
.
108
Chapter 10. Additional Service
Information
.............
111
Security features
.
.
.
.
.
.
.
.
.
.
.
.
.
.
111
Hardware controlled Passwords
.
.
.
.
.
.
111
Operating system password
.
.
.
.
.
.
.
111
Vital product data
.
.
.
.
.
.
.
.
.
.
.
.
111
BIOS levels
.
.
.
.
.
.
.
.
.
.
.
.
.
.
.
.
111
Flash update procedures
.
.
.
.
.
.
.
.
.
.
111
Updating (flashing) the BIOS from a disc
.
.
.
.
111
Updating (flashing) the BIOS from your operating
system
.
.
.
.
.
.
.
.
.
.
.
.
.
.
.
.
.
.
112
Recovering from a POST/BIOS update failure
.
.
112
Power management
.
.
.
.
.
.
.
.
.
.
.
.
113
Automatic configuration and power interface
(ACPI) BIOS
.
.
.
.
.
.
.
.
.
.
.
.
.
.
113
Automatic Power-On features
.
.
.
.
.
.
.
113
Appendix A. Notices
.........
115
Television output notice
.
.
.
.
.
.
.
.
.
.
.
116
European conformance CE mark
.
.
.
.
.
.
.
116
Trademarks
.
.
.
.
.
.
.
.
.
.
.
.
.
.
.
.
116
Index
.................
117
iv
ThinkCentre Hardware Maintenance Manual