Lexmark C752 Setup Guide - Page 19
Installing an output expander
 |
View all Lexmark C752 manuals
Add to My Manuals
Save this manual to your list of manuals |
Page 19 highlights
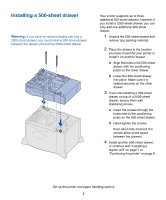
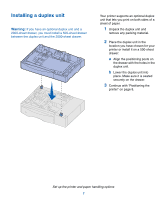
Installing an output expander Note: After you unpack the output expander, install it immediately. Otherwise, the edges of the mounting brackets could damage tabletops or fabrics. Your printer supports an optional output expander that lets you stack up to 650 sheets of paper in one bin. 1 Unpack the output expander and remove any packing material. 2 Remove the printer top cover. Warning: The output expander tray is designed to hold the weight of print material only. Do not use it as a shelf; excess weight may cause it to disengage from the output expander. 3 Align the mounting brackets on the bottom of the output expander with the slots in the top of the printer. 4 Lower the output expander into place. Set up the printer and paper handling options 10
-
 1
1 -
2
-
3
-
4
-
5
-
6
-
7
-
8
-
9
-
10
-
11
-
12
-
13
-
 14
14 -
 15
15 -
 16
16 -
 17
17 -
 18
18 -
 19
19 -
 20
20 -
 21
21 -
 22
22 -
 23
23 -
 24
24 -
25
-
26
-
27
-
28
-
29
-
30
-
31
-
32
-
33
-
34
-
35
-
36
-
37
-
38
-
39
-
40
-
41
-
42
-
43
-
44
-
45
-
46
-
47
-
48
-
49
-
50
-
51
-
52
-
53
-
54
-
55
-
56
-
57
-
58
-
59
-
60
-
61
-
62
-
63
-
64
-
65
-
66
-
67
-
68
-
69
-
70
-
71
-
72
-
73
 |
 |
