Lexmark C752 Setup Guide - Page 66
Direct printing using, Windows 95/98, Me, Windows NT 4.0, Windows 2000, Windows XP,
 |
View all Lexmark C752 manuals
Add to My Manuals
Save this manual to your list of manuals |
Page 66 highlights
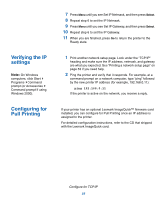
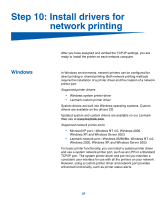
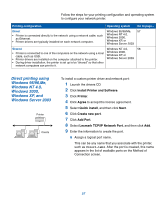
Follow the steps for your printing configuration and operating system to configure your network printer: Printing configuration Operating system Go to page... Direct Windows 95/98/Me, 57 • Printer is connected directly to the network using a network cable, such as Ethernet. • Printer drivers are typically installed on each network computer. Windows NT 4.0, Windows 2000, Windows XP, or Windows Server 2003 Shared Windows NT 4.0, 58 • Printer is connected to one of the computers on the network using a local cable, such as USB. • Printer drivers are installed on the computer attached to the printer. Windows 2000, Windows XP, or Windows Server 2003 • During driver installation, the printer is set up to be "shared" so that other network computers can print to it. Direct printing using Windows 95/98,Me, Windows NT 4.0, Windows 2000, Windows XP, and Windows Server 2003 Printer Clients To install a custom printer driver and network port: 1 Launch the drivers CD. 2 Click Install Printer and Software. 3 Click Printer. 4 Click Agree to accept the license agreement. 5 Select Quick install, and then click Next. 6 Click Create new port. 7 Click Add Port. 8 Select Lexmark TCP/IP Network Port, and then click Add. 9 Enter the information to create the port. a Assign a logical port name. This can be any name that you associate with the printer, such as Color1-lab4. After the port is created, this name appears in the list of available ports on the Method of Connection screen. 57
-
 1
1 -
2
-
3
-
4
-
5
-
6
-
7
-
8
-
9
-
10
-
11
-
12
-
13
-
14
-
15
-
16
-
17
-
18
-
19
-
20
-
21
-
22
-
23
-
24
-
25
-
26
-
27
-
28
-
29
-
30
-
31
-
32
-
33
-
34
-
35
-
36
-
37
-
38
-
39
-
40
-
41
-
42
-
43
-
44
-
45
-
46
-
47
-
48
-
49
-
50
-
51
-
52
-
53
-
54
-
55
-
56
-
57
-
58
-
59
-
60
-
 61
61 -
 62
62 -
 63
63 -
 64
64 -
 65
65 -
 66
66 -
 67
67 -
 68
68 -
 69
69 -
 70
70 -
 71
71 -
72
-
73
 |
 |
