Lexmark C752 Setup Guide - Page 28
Attaching an adhesive operator panel overlay
 |
View all Lexmark C752 manuals
Add to My Manuals
Save this manual to your list of manuals |
Page 28 highlights
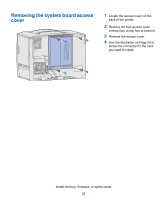
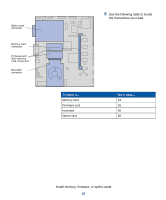
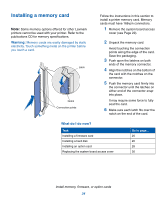
6 Close the front cover. Warning: If the front cover does not close completely, reopen the cover and press in firmly on the cartridges to make sure they are fully seated. Attaching an adhesive operator panel overlay If English is not your preferred language and your printer shipped with an adhesive operator panel overlay, attach the overlay that has the appropriately translated button names: 1 Locate the adhesive overlay packaged with your printer. 2 Peel the protective backing off the overlay. 3 Align the holes in the overlay with the buttons on the operator panel, and then press it into place. 4 Peel the protective covering away from the overlay. Set up the print supplies 19
-
 1
1 -
2
-
3
-
4
-
5
-
6
-
7
-
8
-
9
-
10
-
11
-
12
-
13
-
14
-
15
-
16
-
17
-
18
-
19
-
20
-
21
-
22
-
 23
23 -
 24
24 -
 25
25 -
 26
26 -
 27
27 -
 28
28 -
 29
29 -
 30
30 -
 31
31 -
 32
32 -
 33
33 -
34
-
35
-
36
-
37
-
38
-
39
-
40
-
41
-
42
-
43
-
44
-
45
-
46
-
47
-
48
-
49
-
50
-
51
-
52
-
53
-
54
-
55
-
56
-
57
-
58
-
59
-
60
-
61
-
62
-
63
-
64
-
65
-
66
-
67
-
68
-
69
-
70
-
71
-
72
-
73
 |
 |

19
Set up the print supplies
6
Close the front cover.
Warning:
If the front cover does not close completely,
reopen the cover and press in firmly on the cartridges to
make sure they are fully seated.
Attaching an adhesive operator
panel overlay
If English is not your preferred language
and your printer shipped with an
adhesive operator panel overlay, attach
the overlay that has the appropriately
translated button names:
1
Locate the adhesive overlay
packaged with your printer.
2
Peel the protective backing off the
overlay.
3
Align the holes in the overlay with
the buttons on the operator panel,
and then press it into place.
4
Peel the protective covering away
from the overlay.