Lexmark Forms Printer 2581 User Guide - Page 66
Printer is noisy, Printer sounds like it is printing, but does not print, Printer alarm sounds - windows 7
 |
View all Lexmark Forms Printer 2581 manuals
Add to My Manuals
Save this manual to your list of manuals |
Page 66 highlights
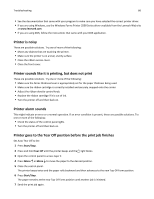
Troubleshooting 66 • See the documentation that came with your program to make sure you have selected the correct printer driver. • If you are using Windows, use the Windows Forms Printer 2500 Series driver available from the Lexmark Web site at www.lexmark.com. • If you are using DOS, follow the instructions that came with your DOS application. Printer is noisy These are possible solutions. Try one of more of the following: • Move any objects that are touching the printer. • Make sure the printer is on a level, sturdy surface. • Close the ribbon access cover. • Close the front cover. Printer sounds like it is printing, but does not print These are possible solutions. Try one or more of the following: • Make sure the forms thickness lever is appropriately set for the paper thickness being used. • Make sure the ribbon cartridge is correctly installed and securely snapped onto the carrier. • Adjust the ribbon density control knob. • Replace the ribbon cartridge if it is out of ink. • Turn the printer off and then back on. Printer alarm sounds This might indicate an error or a normal operation. If an error condition is present, these are possible solutions. Try one or more of the following: • Check the status of the control panel lights. • Turn the printer off and then back on. Printer goes to the Tear Off position before the print job finishes Set Auto Tear Off to On: 1 Press Start/Stop. 2 Press and hold Tear Off until the printer beeps and the light blinks. 3 Open the control panel to access layer 2. 4 Press Micro or Micro to move the paper to the desired position. 5 Close the control panel. The printer beeps twice and the paper rolls backward and then advances to the new Top‑Of‑Form position. 6 Press Start/Stop. The paper remains at the new Top‑Of‑Form position until another job is initiated. 7 Send the print job again.
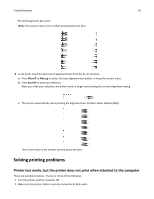
-
 1
1 -
2
-
3
-
4
-
5
-
6
-
7
-
8
-
9
-
10
-
11
-
12
-
13
-
14
-
15
-
16
-
17
-
18
-
19
-
20
-
21
-
22
-
23
-
24
-
25
-
26
-
27
-
28
-
29
-
30
-
31
-
32
-
33
-
34
-
35
-
36
-
37
-
38
-
39
-
40
-
41
-
42
-
43
-
44
-
45
-
46
-
47
-
48
-
49
-
50
-
51
-
52
-
53
-
54
-
55
-
56
-
57
-
58
-
59
-
60
-
 61
61 -
 62
62 -
 63
63 -
 64
64 -
 65
65 -
 66
66 -
 67
67 -
 68
68 -
 69
69 -
 70
70 -
 71
71 -
72
-
73
-
74
-
75
-
76
-
77
-
78
-
79
-
80
-
81
-
82
-
83
-
84
 |
 |