Lexmark Forms Printer 2581 User Guide - Page 68
Incorrect characters print, left margin changes, or printing stops
 |
View all Lexmark Forms Printer 2581 manuals
Add to My Manuals
Save this manual to your list of manuals |
Page 68 highlights
Troubleshooting 68 Incorrect characters print, left margin changes, or printing stops These are possible solutions. Try one or more of the following: • Make sure the printer cable is properly shielded and correctly connected at both ends. • Select the correct driver. - If you are using Windows, use the Windows Forms Printer 2500 Series driver available from the Lexmark Web site at www.lexmark.com. - If you are using DOS, follow the instructions that came with your DOS application. Printing continues beyond the edges of the continuous forms These are possible solutions. Try one or more of the following: • Change the program so that the selected paper size is the same as the actual paper size. • Adjust tractors or paper guides to align with the paper being used. • Make sure the ribbon cartridge is correctly installed. • Clear any paper jam. • Turn the printer off and then back on. Selected font or pitch is not printing or is changing If you encounter this problem, your software is overriding your control panel font and/or pitch selection, or using graphic fonts. If possible, use resident fonts and/or pitches. Otherwise, try the following solution: • Select another font from the Character Options selection of the Main menu. • Select another pitch from the Character Options selection of the Main menu. Solving paper feed problems Paper is jammed in the printer To clear a continuous forms paper jam: 1 Turn the printer off. 2 Detach any continuous forms that have already printed. 3 Set the forms thickness lever to position 7. 4 Tear the continuous forms off at the perforation line just below the bottom of the printer. 5 Open the front cover. 6 Open the left and right tractor doors, and then remove the paper. 7 Remove the ribbon access cover to clear any torn paper. 8 Remove torn perforation strips or bits of paper from the paper path.
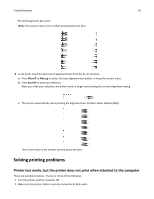
-
 1
1 -
2
-
3
-
4
-
5
-
6
-
7
-
8
-
9
-
10
-
11
-
12
-
13
-
14
-
15
-
16
-
17
-
18
-
19
-
20
-
21
-
22
-
23
-
24
-
25
-
26
-
27
-
28
-
29
-
30
-
31
-
32
-
33
-
34
-
35
-
36
-
37
-
38
-
39
-
40
-
41
-
42
-
43
-
44
-
45
-
46
-
47
-
48
-
49
-
50
-
51
-
52
-
53
-
54
-
55
-
56
-
57
-
58
-
59
-
60
-
61
-
62
-
 63
63 -
 64
64 -
 65
65 -
 66
66 -
 67
67 -
 68
68 -
 69
69 -
 70
70 -
 71
71 -
 72
72 -
 73
73 -
74
-
75
-
76
-
77
-
78
-
79
-
80
-
81
-
82
-
83
-
84
 |
 |