Lexmark Forms Printer 2581 User Guide - Page 73
Characters are wrong or missing, Forms are smudged or print is too dark
 |
View all Lexmark Forms Printer 2581 manuals
Add to My Manuals
Save this manual to your list of manuals |
Page 73 highlights
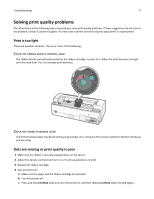
Troubleshooting 73 d Press Start/Stop to stop or interrupt the printer test. e Press Start/Stop again if you want to resume the printer test. Printing continues until you turn the printer off. If the print quality does not improve, contact Customer Support. Characters are wrong or missing Run a printer test: 1 Make sure the forms thickness lever setting is in a position that corresponds with the forms you are using. 2 Make sure paper and the ribbon cartridge are installed. 3 Set the paper select lever to the position that corresponds with the forms you are using. 4 Turn the printer off. 5 Press and hold LineFeed while you turn the printer on. 6 Release LineFeed when printing starts. Printing continues until you stop the printer. 7 Press Start/Stop to stop the printing, and then turn the printer off. Forms are smudged or print is too dark These are possible solutions. Try one or more of the following: • Make sure the forms thickness lever is in the appropriate position for the paper being used. • Make sure the ribbon is installed correctly. • Untwist or untangle the ribbon. • Remove the ribbon slack using the ribbon advance knob. • Set the density control knob to 1. • Remove and replace the ribbon cartridge. Incorrect number of lines on a page These are possible solutions. Try one or more of the following: • Make sure the paper is free to feed from the carton and there is nothing obstructing paper movement. • Readjust the Top‑Of‑Form. For more information, see "Setting Top-of-Form" on page 39. • From the Setup menu, adjust the page length. For more information, see "Using Setup mode" on page 47. Graphics do not print These are possible solutions. Try one or more of the following: • See the documentation that came with your software application. • Make sure the correct printer driver is selected.
-
 1
1 -
2
-
3
-
4
-
5
-
6
-
7
-
8
-
9
-
10
-
11
-
12
-
13
-
14
-
15
-
16
-
17
-
18
-
19
-
20
-
21
-
22
-
23
-
24
-
25
-
26
-
27
-
28
-
29
-
30
-
31
-
32
-
33
-
34
-
35
-
36
-
37
-
38
-
39
-
40
-
41
-
42
-
43
-
44
-
45
-
46
-
47
-
48
-
49
-
50
-
51
-
52
-
53
-
54
-
55
-
56
-
57
-
58
-
59
-
60
-
61
-
62
-
63
-
64
-
65
-
66
-
67
-
 68
68 -
 69
69 -
 70
70 -
 71
71 -
 72
72 -
 73
73 -
 74
74 -
 75
75 -
 76
76 -
 77
77 -
 78
78 -
79
-
80
-
81
-
82
-
83
-
84
 |
 |