NEC PX-50VP1A 42PD2/50PD1 - Page 10
Setup Procedure - power supply
 |
View all NEC PX-50VP1A manuals
Add to My Manuals
Save this manual to your list of manuals |
Page 10 highlights
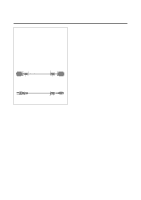
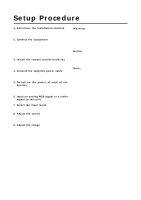
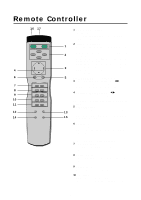
Setup Procedure 1. Determine the installation location * To ensure safe use, see "Before Use" and "Observe the Following," then install properly. 2. Connect the equipment Set the termination switch (75Ω/high impedance). Set the DIP switches to suit the application and system structure. (See Page 17.) (Loop-out connections are for one unit, maximum.) 3. Install the remote control batteries. * To use the remote control in the wired arrangement, connect the supplied remote control cable. 4. Connect the supplied power cable * The maximum current rating 5.6(A) : 42PD2 * The maximum current rating 7.4(A) : 50PD1 5. Switch on the power of each of the devices * When connected with a computer, switch on the power of the computer first. 6. Input an analog RGB signal or a video signal to this unit 7. Select the input mode * Select the appropriate RGB input or video input. 8. Adjust the screen * Make adjustments when adjustment of the screen display position or distortion is required. 9. Adjust the image * Make adjustments when adjustment of the tint, brightness, or contrast is required. Warning For proper installation and mounting it is strongly recommended to use a trained, authorized NEC dealer. Failure to follow correct mounting procedures could result in damage to the unit or injury to the installer. Product warranty does not cover damage caused by improper installation. Notice: This monitor requires the use of a tabletop stand or wall mount unit for permanent installation and use. This monitor cannot be used without one of these accessories. Note: RETRACTABLE FEET ARE FOR TEMPORARY USE ONLY AND ARE NOT INTENDED FOR PERMANENT INSTALLATION. MODEL # PX-42VPU1-ST STAND IS REQUIRED FOR PERMANENT TABLETOP INSTALLATION. REPLACE THE FEET WHEN YOU MOVE THE MONITOR. 10
-
 1
1 -
2
-
3
-
4
-
 5
5 -
 6
6 -
 7
7 -
 8
8 -
 9
9 -
 10
10 -
 11
11 -
 12
12 -
 13
13 -
 14
14 -
 15
15 -
16
-
17
-
18
-
19
-
20
-
21
-
22
-
23
-
24
-
25
-
26
-
27
-
28
-
29
-
30
-
31
-
32
-
33
-
34
-
35
-
36
-
37
-
38
-
39
-
40
-
41
-
42
-
43
-
44
-
45
-
46
-
47
-
48
-
49
-
50
-
51
-
52
-
53
-
54
-
55
-
56
-
57
-
58
-
59
-
60
-
61
-
62
-
63
-
64
 |
 |