NEC PX-50VP1A 42PD2/50PD1 - Page 24
Adjustment of the Image, Returning the Image, Adjustments to the Factory, Default Settings NORMAL
 |
View all NEC PX-50VP1A manuals
Add to My Manuals
Save this manual to your list of manuals |
Page 24 highlights
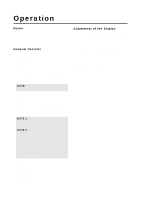
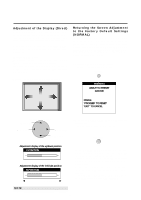
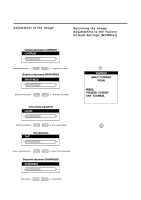
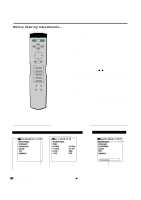
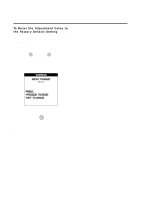
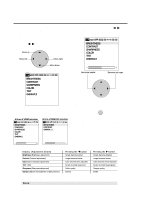
Adjustment of the Image Press the button to show the adjustment display. The display will go off about 3 seconds after your finger is released from the button. Items adjusted with the VIDEO and RGB signals Contrast adjustment (CONTRAST) CONTRAST Image becomes fainter CONTRAST Image becomes denser Brightness adjustment (BRIGHTNESS) BRIGHTNESS Returning the Image Adjustments to the Factory Default Settings (NORMAL) The contrast, brightness, color, tint, gamma, color temp and sharpness adjustments can be returned to the factory default settings. At this time, White Balance of the menu control will simultaneously return to the factory default setting. 1. Press the VISUAL NORMAL button The verification sub menu is displayed. VISUAL NORMAL WARNING ABOUT TO PRESET VISUAL Screen becomes darker BRIGHT Screen becomes brighter PRESS: 'PROCEED' TO RESET 'EXIT' TO CANCEL Items adjusted with only VIDEO signals Color density adjustment COLOR Color becomes lighter VIDEO COLOR Color becomes deeper 2. A press of the PROCEED button will reset the adjustment. To cancel the reset, press the EXIT button. PROCEED TINT Screen is tinted toward red Tint adjustment TINT Screen is tinted toward green * Use the VISUAL NORMAL button. A press of the RASTER NORMAL button will not return the screen adjustment to the factory default setting. * A press of the NORMAL button during the on-screen display will return only the display item to the factory default setting. Sharpness adjustment (SHARPNESS) SHARPNESS Softer quality SHARPNESS Sharper quality 24
-
 1
1 -
2
-
3
-
4
-
5
-
6
-
7
-
8
-
9
-
10
-
11
-
12
-
13
-
14
-
15
-
16
-
17
-
18
-
 19
19 -
 20
20 -
 21
21 -
 22
22 -
 23
23 -
 24
24 -
 25
25 -
 26
26 -
 27
27 -
 28
28 -
 29
29 -
30
-
31
-
32
-
33
-
34
-
35
-
36
-
37
-
38
-
39
-
40
-
41
-
42
-
43
-
44
-
45
-
46
-
47
-
48
-
49
-
50
-
51
-
52
-
53
-
54
-
55
-
56
-
57
-
58
-
59
-
60
-
61
-
62
-
63
-
64
 |
 |
