NEC PX-50VP1A 42PD2/50PD1 - Page 41
Present Time, Date : 1999. Dec 10, Time : 22 : 30, Timer : Off, Timer : On, Press 'proceed' For,
 |
View all NEC PX-50VP1A manuals
Add to My Manuals
Save this manual to your list of manuals |
Page 41 highlights
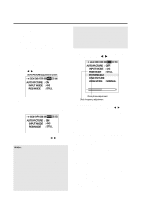
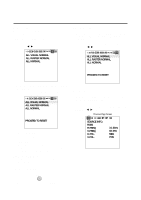
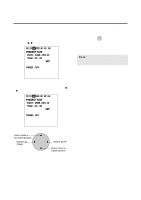
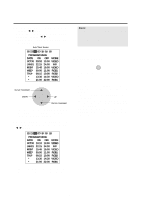
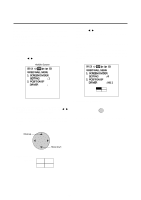
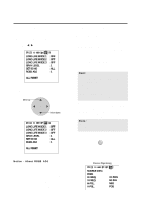
Auto Timer Screen Used to turn the power ON/OFF, change inputs or enter the invert mode. 1. Align the cursor with icon (11) of the second page of the OSM. The cursor is moved left and right with the POSITION CONTROLᮤ / ᮣ buttons. Icon (11) PRESENT TIME DATE : 1999. DEC 10 TIME : 22 : 30 SET TIMER : OFF 2. Use the v / w buttons, select TIMER and switch ON using the ᮤ / ᮣ buttons, then press the PROCEED button. * The cursor is moved up and down with the POSITION CONTROL v / w buttons. PRESENT TIME DATE : 1999. DEC 10 TIME : 22 : 30 SET TIMER : ON PRESS 'PROCEED' FOR PROGRAM MENU 4. Use the v / w buttons to select a line item under DATE. The sub menu is displayed. Auto Timer Screen PROGRAM MENU DATE ON OFF MODE OCT30 10:10 13:00 VIDEO JAN01 22:15 24:00 INV MON* 15:45 19:00 VIDEO WED* 09:00 11:00 RGB1 THU* 08:15 10:00 RGB2 * 13:30 14:30 VIDEO * 21:00 22:00 RGB1 5. Press PROCEED to select either DIRECT, DAILY, and WEEKLY. 6. Use the v / w buttons to highlight DIRECT DAILY, and WEEKLY. The cursor is moved up and down with the POSITION CONTROLv / w buttons. 1. DIRECT 2. DAILY 3. WEEKLY 7. Press EXIT to return to PROGRAM MENU. EXIT 3. Press PROCEED to enter the PROGRAM MENU. The DATE display is as follows: DIRECT ..... shows in the format of JAN-DEC**. This relates to a given day that the function will be performed. The function will only happen on that day at that time. DAILY ....... shows in the format of *. This relates to a function being performed everyday for a predetermined time. WEEKLY ..shows in the format of MON, TUE, WED, THU, FRI, SAT, SUN. This relates to a function being performed on that specific day and time every week. 41
-
 1
1 -
2
-
3
-
4
-
5
-
6
-
7
-
8
-
9
-
10
-
11
-
12
-
13
-
14
-
15
-
16
-
17
-
18
-
19
-
20
-
21
-
22
-
23
-
24
-
25
-
26
-
27
-
28
-
29
-
30
-
31
-
32
-
33
-
34
-
35
-
 36
36 -
 37
37 -
 38
38 -
 39
39 -
 40
40 -
 41
41 -
 42
42 -
 43
43 -
 44
44 -
 45
45 -
 46
46 -
47
-
48
-
49
-
50
-
51
-
52
-
53
-
54
-
55
-
56
-
57
-
58
-
59
-
60
-
61
-
62
-
63
-
64
 |
 |
