NEC PX-50VP1A 42PD2/50PD1 - Page 43
Video Wall Menu, Screen Divider, Setting, Position Of, Driver
 |
View all NEC PX-50VP1A manuals
Add to My Manuals
Save this manual to your list of manuals |
Page 43 highlights
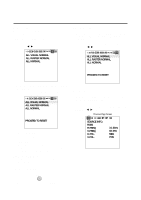
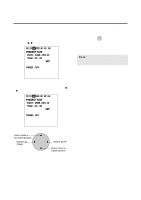
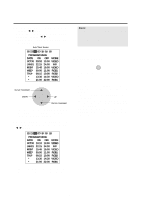
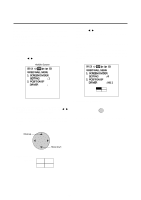
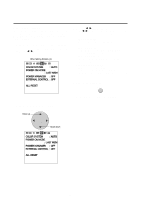
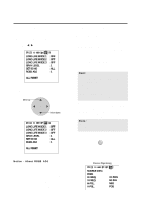
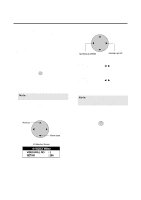
Multiple Screens Select the screen mode from among 1 or 4 screens. (Normally 1 is selected.) VIDEO WALL can be achieved from two or four screens with the sole use of the main unit. For information about compatible signals, see the Signal Preset Table of factory setting values on Page 49. 1. Align the cursor with icon (12) on the second page The cursor is moved left and right with the POSITION CONTROLᮤ / ᮣ buttons. Multiple Screens Icon (12) VIDEO WALL MENU 1. SCREEN DIVIDER SETTING : 1 2. POSITION OF DRIVER : 3. Align the cursor with POSITION OF SETTING and set with the ᮤ / ᮣ buttons. Nothing will be displayed when "1" is selected in the SCREEN WALL MENU. When "4" is selected, the icon of the right screen is displayed. Use the right cursor button to go clockwise and select screen 1 from among the 4 screens. Set the number to "1" at the upper left, and display "1 to 4" going clockwise. There is no selection for the initial value. VIDEO WALL MENU 1. SCREEN DIVIDER SETTING : 4 2. POSITION OF DRIVER : NO.1 2. Align the cursor using v / w buttons with the SCREEN DIVIDER SETTING and use the ᮤ / ᮣ buttons to select 1 screen or 4 screens. Use the left and right cursors to change the setting between 1 → 4 → in toggle fashion. (The initial value is 1.) 4. Return to the main menu EXIT * To delete the main menu, press the EXIT button once more. POSITION / CONTROL Move up Move down Screen selection: 4 Screens No.1 No.4 No.2 No.3 43
-
 1
1 -
2
-
3
-
4
-
5
-
6
-
7
-
8
-
9
-
10
-
11
-
12
-
13
-
14
-
15
-
16
-
17
-
18
-
19
-
20
-
21
-
22
-
23
-
24
-
25
-
26
-
27
-
28
-
29
-
30
-
31
-
32
-
33
-
34
-
35
-
36
-
37
-
 38
38 -
 39
39 -
 40
40 -
 41
41 -
 42
42 -
 43
43 -
 44
44 -
 45
45 -
 46
46 -
 47
47 -
 48
48 -
49
-
50
-
51
-
52
-
53
-
54
-
55
-
56
-
57
-
58
-
59
-
60
-
61
-
62
-
63
-
64
 |
 |
