NEC PX-50VP1A 42PD2/50PD1 - Page 47
Troubleshooting - no video problems no fans
 |
View all NEC PX-50VP1A manuals
Add to My Manuals
Save this manual to your list of manuals |
Page 47 highlights
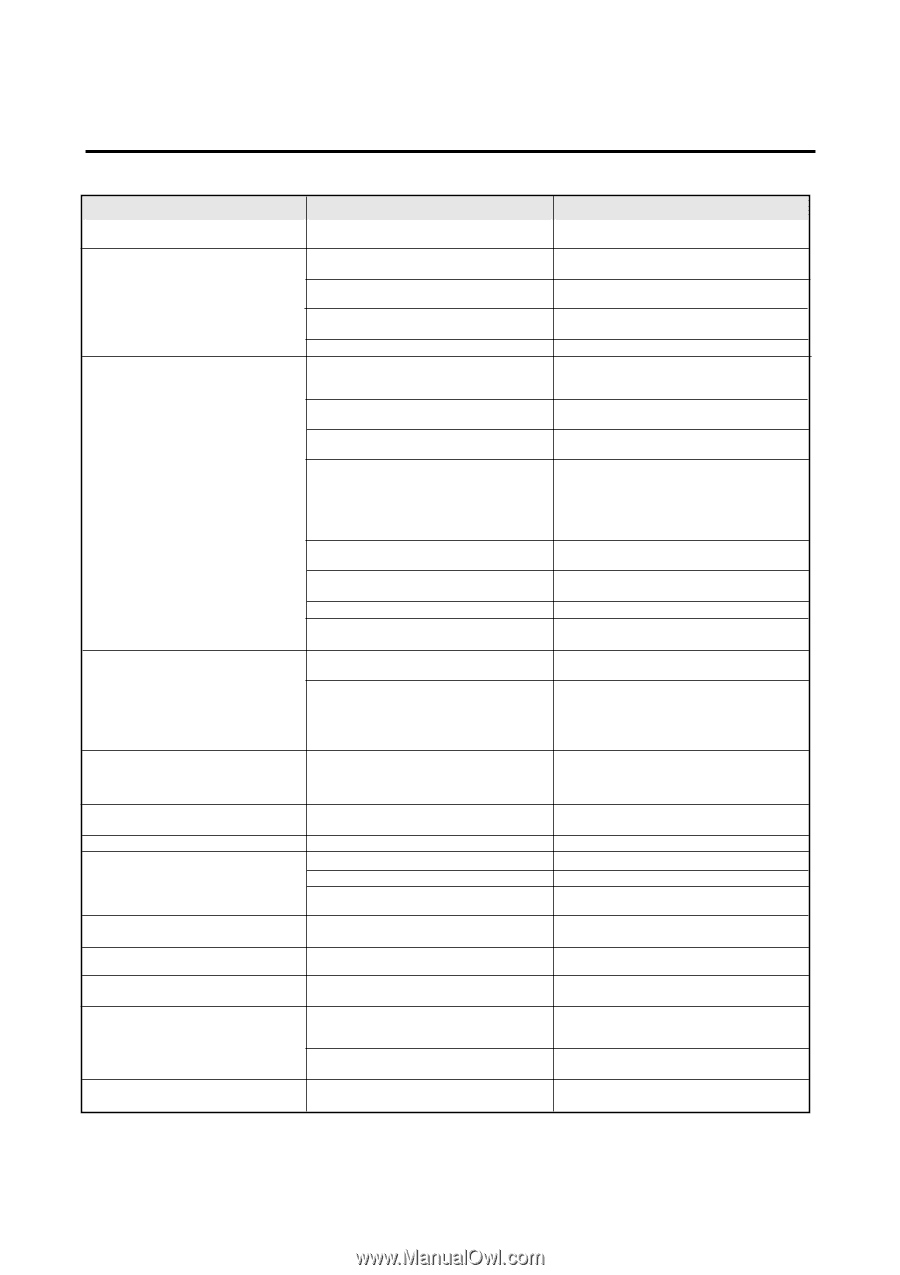
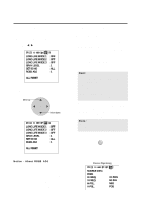
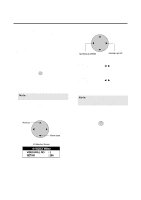
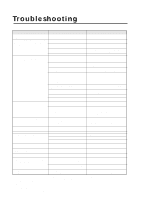
Troubleshooting If the picture quality is poor or there is some other problem, check the adjustments, operations, etc., before requesting service. Symptom Picture is disturbed. Remote control unit operates erroneously. Monitor's power does not turn on when the remote controller's power button is pressed. Monitor does not operate when the remote controller's buttons are pressed. No Picture is produced. Poor picture with VIDEO signal input. Poor picture with RGB signal input. Tint is poor or colors are weak. Nothing appears on screen. Part of picture is cut off or picture is not centered. Image is too large or too small. Picture is unstable. POWER/STANDBY indicator is lighted in orange or yellow. POWER/STANDBY indicator is blinking in green. Checks • Is a connected component set directly in front or at the side of the display? • Is the monitor's power cord plugged into a power outlet? • Are all the monitor's indicators off? • Has an ID number been set for the main unit? • Are the remote controller's batteries worn out? • Is the remote controller pointed at the monitor, or is there an obstacle between the remote controller and the monitor? • Is direct sunlight or strong artificial light shining on the monitor's remote control sensor? • You are not within the effective operating range.(Wireless) • Incorrect setting of DIP SW (Wireless) When in the EXT.CONTROL mode, the remote control unit will not operate the monitor. The remote cable is piugged into the REMOTE IN terminal (Wireless). • Is the EXTERNAL CONTROL setting 1 or 2? • Has an ID number been set for the main unit? • Are the remote controller's batteries worn out? • The front panel buttons of the main unit do not function • Is the monitor's power cord plugged into a power outlet? • Power outlet inactive. Power of external equipment is not ON. External equipment has been incorrecty connected. Incorrect input selection. • Improper control setting. Local interference. Cable interconnections. Input impedance is not correct level. • Improper control setting. Incorrect 15 PIN connector pin connections. • Are the tint and colors properly adjusted? • Is the computer's power turned on? • Is a source connected? • Is the power manager function in the standby or off mode? • Is the position adjustment appropriate? • Is the screen size adjustment appropriate? • Is the computer's resolution setting appropriate? • Horizontal and/or vertical sync signal is not present when the Intelligent Power Manager control is on. • POWER/STANDBY indicatoris flashing red • The temperature inside the main unit has become too high and has activated the protector. Remedy • Leave some space between the display and the connected components. • Plug the monitor's power cord into a power outlet. • Plug the monitor's power cord into a power outlet. • Set an ID number with the ID SELECT button, or set the ID number to ALL. • Replace both batteries with new ones. • Point the remote controller at the monitor's re- mote control sensor when pressing buttons, or remove the obstacle. • Eliminate the light by closing curtains, pointing the light in a different direction, etc. • Use the remote control unit within 30º left and right of center (at a diatance of 22ft). • Set Pin No.2 to ON. Unplung the remote cable from the monitor. • Use the remote control to set the EXTERNAL CONTROL to OFF. • Set an ID number with the ID SELECT button, or set the ID number to ALL. • Replace both batteries with new ones. • The front panel buttons do not function during Control Lock • Plug the monitor's power cord into a power outlet. • Be sure wall switch is on and outlet has power. Switch to ON or connect to an active AC outlet. Correct all connections. Press correct RGB1, RGB2, RGB3, or VIDEO button. • Adjust picture controls as needed. Try another location for the monitor. Be sure all connections are secure. • Adjust picture controls as needed. Check pin assignments and connections. • Adjust the tint and color. • Turn on the computer's power. • Connect source to the monitor. • Operate the computer (move the mouse. etc.) • Adjust the "RGB ADJ." properly. • Make the adjustment with the wide screen setting. • Set to the proper resolution. • Check the input signal. • The unit is OFF in the timer operation; this is not a malfunction. • Promptly switch off the power of the main unit and wait until the internal temperature drops. In the following case, power off the monitor immediately and contact your dealer or authorized NEC Service Center. The monitor turns off in 5 seconds after powering on and then the POWER/STANDBY indicater blinks. It indicaters that the power supply circuit or, one more fans have been damaged. Overheat protector If the monitor becomes too hot, the overheat protector will be activated and the monitor will be turned off. If this happens., turn off the power to the monitor and unplug the power cord. If the room where the monitor is installed is particularly hot, move monitor to a cooler location, and wait for the monitor to cool for 60 minutes. If the problem persists, contact your NEC dealer for service. 47
-
 1
1 -
2
-
3
-
4
-
5
-
6
-
7
-
8
-
9
-
10
-
11
-
12
-
13
-
14
-
15
-
16
-
17
-
18
-
19
-
20
-
21
-
22
-
23
-
24
-
25
-
26
-
27
-
28
-
29
-
30
-
31
-
32
-
33
-
34
-
35
-
36
-
37
-
38
-
39
-
40
-
41
-
 42
42 -
 43
43 -
 44
44 -
 45
45 -
 46
46 -
 47
47 -
 48
48 -
 49
49 -
 50
50 -
 51
51 -
 52
52 -
53
-
54
-
55
-
56
-
57
-
58
-
59
-
60
-
61
-
62
-
63
-
64
 |
 |