Netgear FSM726S FSM726S User Manual - Page 28
of 110
 |
UPC - 606449023091
View all Netgear FSM726S manuals
Add to My Manuals
Save this manual to your list of manuals |
Page 28 highlights
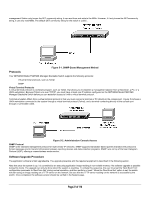
Note: It is highly recommended, though not necessary, to use a RS-232 serial port connection to the switch during the software upgrading procedure. When using a Telnet Session or web interface alone, your connection to the switch will not be available until the switch has entered forwarding mode. This takes approximately three minutes. The upgrade procedure is as follow: 1. Go to Main Menu>Tools>Software Upgrade (in the Web or Console Interface). 2. Select 'Boot from Net' option. 3. Verify information such as the IP address for the TFTP Server, Gateway IP address, and the file name and its path of the new image. 4. Save the setting in non-volatile memory. In the Browser interface, use the 'Apply' button, and the Tools> Save Configuration screen. In the console interface, use Ctrl-W and confirm the change to NVRAM. 5. Restart the system via the Tools>Reset command 6. Bootstrap will retrieve the new image then pass control to it. 7. The system executes the new software image. Note: the previous image in non-volatile memory will not be replaced by the new image using this option. The image in non-volatile memory will only be over-written if 'Boot from Net and Save' option is selected. 8. Test your switch to make sure the new image is working correctly. If you decide to keep the new image, go to Software Download again. Select 'Boot from Net & Save' option. 9. Save the setting in non-volatile memory. In the Browser interface, use the 'Apply' button, and the Tools> Save Configuration screen. In the console interface, use Ctrl-W and confirm the change to NVRAM. 10. Restart the system via the Tools>Reset command 11. The new image should over-write the old image in non-volatile memory. Verify it by going to the Software Download screen and checking the Software Release information. Note: IP address, Network Mask, and Default Gateway are not affected by upgrading the software. The settings will still be in non-volatile memory. Page 28 of 110
-
 1
1 -
2
-
3
-
4
-
5
-
6
-
7
-
8
-
9
-
10
-
11
-
12
-
13
-
14
-
15
-
16
-
17
-
18
-
19
-
20
-
21
-
22
-
 23
23 -
 24
24 -
 25
25 -
 26
26 -
 27
27 -
 28
28 -
 29
29 -
 30
30 -
 31
31 -
 32
32 -
 33
33 -
34
-
35
-
36
-
37
-
38
-
39
-
40
-
41
-
42
-
43
-
44
-
45
-
46
-
47
-
48
-
49
-
50
-
51
-
52
-
53
-
54
-
55
-
56
-
57
-
58
-
59
-
60
-
61
-
62
-
63
-
64
-
65
-
66
-
67
-
68
-
69
-
70
-
71
-
72
-
73
-
74
-
75
-
76
-
77
-
78
-
79
-
80
-
81
-
82
-
83
-
84
-
85
-
86
-
87
-
88
-
89
-
90
-
91
-
92
-
93
-
94
-
95
-
96
-
97
-
98
-
99
-
100
-
101
-
102
-
103
-
104
-
105
-
106
-
107
-
108
-
109
-
110
 |
 |