Netgear RN526X Software Manual - Page 168
Change the Teaming Mode, Delete a Bonded Adapter, Continued
 |
View all Netgear RN526X manuals
Add to My Manuals
Save this manual to your list of manuals |
Page 168 highlights
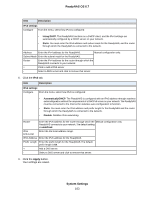
ReadyNAS OS 6.7 (Continued) Item + - Description Add a DNS server. Select a DNS server and click to remove that server. 9. Click the Apply button. Your settings are saved. 10. Configure the switch or router to which the ReadyNAS is attached to support the bonded adapter. Change the Teaming Mode To change the teaming mode of a bonded adapter: 1. Log in to your ReadyNAS. 2. Select Network > Bonds. The page updates showing the bonded interfaces. 3. Click the gear icon for the bonded adapter. 4. Click the Settings button in the pop-up menu. The bond settings pop-up window opens. 5. Click the Mode tab. 6. In the Teaming Mode menu, select a teaming mode. For more information about teaming modes, see Teaming Modes on page 164. 7. (For IEEE 802.3ad LACP and XOR only) Select the radio button next to the hash type option that you want to use. For more information about hash types, see Hash Types on page 164. 8. (For Active Backup only) From the Primary Device menu, select the Ethernet interface that is active by default. Other Ethernet interfaces in the bond become active if and only if the active interface fails. 9. Click the Apply button. Your settings are saved. Delete a Bonded Adapter To delete a bonded adapter and reestablish separate Ethernet links: 1. Log in to your ReadyNAS. 2. Select Network > Bonds. The page updates showing the bonded interfaces. 3. Click the gear icon for the bonded adapter. 4. Click the Delete button in the pop-up menu. 5. Confirm the deletion. System Settings 168
-
 1
1 -
2
-
3
-
4
-
5
-
6
-
7
-
8
-
9
-
10
-
11
-
12
-
13
-
14
-
15
-
16
-
17
-
18
-
19
-
20
-
21
-
22
-
23
-
24
-
25
-
26
-
27
-
28
-
29
-
30
-
31
-
32
-
33
-
34
-
35
-
36
-
37
-
38
-
39
-
40
-
41
-
42
-
43
-
44
-
45
-
46
-
47
-
48
-
49
-
50
-
51
-
52
-
53
-
54
-
55
-
56
-
57
-
58
-
59
-
60
-
61
-
62
-
63
-
64
-
65
-
66
-
67
-
68
-
69
-
70
-
71
-
72
-
73
-
74
-
75
-
76
-
77
-
78
-
79
-
80
-
81
-
82
-
83
-
84
-
85
-
86
-
87
-
88
-
89
-
90
-
91
-
92
-
93
-
94
-
95
-
96
-
97
-
98
-
99
-
100
-
101
-
102
-
103
-
104
-
105
-
106
-
107
-
108
-
109
-
110
-
111
-
112
-
113
-
114
-
115
-
116
-
117
-
118
-
119
-
120
-
121
-
122
-
123
-
124
-
125
-
126
-
127
-
128
-
129
-
130
-
131
-
132
-
133
-
134
-
135
-
136
-
137
-
138
-
139
-
140
-
141
-
142
-
143
-
144
-
145
-
146
-
147
-
148
-
149
-
150
-
151
-
152
-
153
-
154
-
155
-
156
-
157
-
158
-
159
-
160
-
161
-
162
-
 163
163 -
 164
164 -
 165
165 -
 166
166 -
 167
167 -
 168
168 -
 169
169 -
 170
170 -
 171
171 -
 172
172 -
 173
173 -
174
-
175
-
176
-
177
-
178
-
179
-
180
-
181
-
182
-
183
-
184
-
185
-
186
-
187
-
188
-
189
-
190
-
191
-
192
-
193
-
194
-
195
-
196
-
197
-
198
-
199
-
200
-
201
-
202
-
203
-
204
-
205
-
206
-
207
-
208
-
209
-
210
-
211
-
212
-
213
-
214
-
215
-
216
-
217
-
218
-
219
-
220
-
221
-
222
-
223
-
224
-
225
-
226
-
227
-
228
-
229
-
230
-
231
-
232
-
233
-
234
-
235
-
236
-
237
-
238
-
239
-
240
-
241
-
242
-
243
-
244
-
245
-
246
-
247
-
248
-
249
-
250
-
251
-
252
-
253
-
254
-
255
 |
 |
