Netgear WAX620 User Manual - Page 20
Position your access point for best performance
 |
View all Netgear WAX620 manuals
Add to My Manuals
Save this manual to your list of manuals |
Page 20 highlights
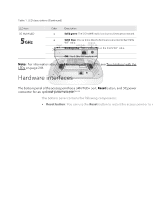
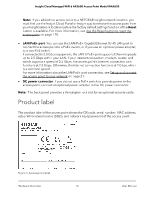
Insight Cloud Managed WiFi 6 AX3600 Access Point Model WAX620 Position your access point for best performance Before you install and mount your access point as described in the installation guide or an appendix to this manual, consider how you can position the access point for best performance. WiFi clients that are within the access point WiFi range can connect to the WiFi network. However, the WiFi range can vary significantly depending on the physical placement of your access point. For example, the thickness, density, and number of walls the WiFi signal passes through can limit the range. Additionally, other WiFi devices in and around your office, home, yard, or campus, might affect your access point's signal. WiFi devices can be other access points, routers, repeaters, WiFi range extenders, and any other devices that emit WiFi signals to provide network access. Tips for positioning your access point: • Place your access point near the center of the area where the WiFi clients operate. A line of sight between the access point and the WiFi clients is not required for good performance. • If you use a power adapter, make sure that the access point is within reach of an AC power outlet. • Place the access point in an elevated location, minimizing the number of walls and ceilings between the access point and the WiFi clients. • Place the access point away from electrical devices such as these: - Ceiling fans - Home security systems - Microwaves - Computers - Bases of cordless phones - 2.4 GHz and 5.8 GHz cordless phones • Place the access point away from large metal surfaces, large glass surfaces, insulated walls, and items such as these: - Solid metal doors - Aluminum studs - Fish tanks Install the Access Point in Your 20 Network and Access It for Initial Configuration User Manual
-
 1
1 -
2
-
3
-
4
-
5
-
6
-
7
-
8
-
9
-
10
-
11
-
12
-
13
-
14
-
 15
15 -
 16
16 -
 17
17 -
 18
18 -
 19
19 -
 20
20 -
 21
21 -
 22
22 -
 23
23 -
 24
24 -
 25
25 -
26
-
27
-
28
-
29
-
30
-
31
-
32
-
33
-
34
-
35
-
36
-
37
-
38
-
39
-
40
-
41
-
42
-
43
-
44
-
45
-
46
-
47
-
48
-
49
-
50
-
51
-
52
-
53
-
54
-
55
-
56
-
57
-
58
-
59
-
60
-
61
-
62
-
63
-
64
-
65
-
66
-
67
-
68
-
69
-
70
-
71
-
72
-
73
-
74
-
75
-
76
-
77
-
78
-
79
-
80
-
81
-
82
-
83
-
84
-
85
-
86
-
87
-
88
-
89
-
90
-
91
-
92
-
93
-
94
-
95
-
96
-
97
-
98
-
99
-
100
-
101
-
102
-
103
-
104
-
105
-
106
-
107
-
108
-
109
-
110
-
111
-
112
-
113
-
114
-
115
-
116
-
117
-
118
-
119
-
120
-
121
-
122
-
123
-
124
-
125
-
126
-
127
-
128
-
129
-
130
-
131
-
132
-
133
-
134
-
135
-
136
-
137
-
138
-
139
-
140
-
141
-
142
-
143
-
144
-
145
-
146
-
147
-
148
-
149
-
150
-
151
-
152
-
153
-
154
-
155
-
156
-
157
-
158
-
159
-
160
-
161
-
162
-
163
-
164
-
165
-
166
-
167
-
168
-
169
-
170
-
171
-
172
-
173
-
174
-
175
-
176
-
177
-
178
-
179
-
180
-
181
-
182
-
183
-
184
-
185
-
186
-
187
-
188
-
189
-
190
-
191
-
192
-
193
-
194
-
195
-
196
-
197
-
198
-
199
-
200
-
201
-
202
-
203
-
204
-
205
-
206
-
207
-
208
-
209
-
210
-
211
-
212
-
213
-
214
-
215
-
216
-
217
-
218
-
219
-
220
-
221
-
222
-
223
-
224
-
225
-
226
-
227
-
228
-
229
-
230
-
231
-
232
-
233
-
234
-
235
-
236
-
237
-
238
-
239
-
240
-
241
-
242
-
243
-
244
-
245
-
246
-
247
-
248
-
249
-
250
-
251
-
252
-
253
-
254
-
255
-
256
-
257
-
258
-
259
-
260
-
261
-
262
-
263
-
264
-
265
-
266
 |
 |
