Netgear WAX620 User Manual - Page 260
B. Mount the Access Point to a Wall or Ceiling
 |
View all Netgear WAX620 manuals
Add to My Manuals
Save this manual to your list of manuals |
Page 260 highlights
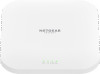
B Mount the Access Point to a Wall or Ceiling The access point package includes wall-mounting and ceiling-mounting components. You can mount the access point to a solid surface (a wall or a ceiling) or to a ceiling with a 15/16 in. (23.8 mm) T-bar, or you can install the access point freestanding on a flat surface. We recommend that you use a flat Ethernet cable so that the cable fits in the narrow space between the access point and the surface on which it is mounted or placed. This appendix includes the following sections: • Mount the access point to a wall • Mount the access point to a solid ceiling • Mount the access point to a T-bar 260
-
 1
1 -
2
-
3
-
4
-
5
-
6
-
7
-
8
-
9
-
10
-
11
-
12
-
13
-
14
-
15
-
16
-
17
-
18
-
19
-
20
-
21
-
22
-
23
-
24
-
25
-
26
-
27
-
28
-
29
-
30
-
31
-
32
-
33
-
34
-
35
-
36
-
37
-
38
-
39
-
40
-
41
-
42
-
43
-
44
-
45
-
46
-
47
-
48
-
49
-
50
-
51
-
52
-
53
-
54
-
55
-
56
-
57
-
58
-
59
-
60
-
61
-
62
-
63
-
64
-
65
-
66
-
67
-
68
-
69
-
70
-
71
-
72
-
73
-
74
-
75
-
76
-
77
-
78
-
79
-
80
-
81
-
82
-
83
-
84
-
85
-
86
-
87
-
88
-
89
-
90
-
91
-
92
-
93
-
94
-
95
-
96
-
97
-
98
-
99
-
100
-
101
-
102
-
103
-
104
-
105
-
106
-
107
-
108
-
109
-
110
-
111
-
112
-
113
-
114
-
115
-
116
-
117
-
118
-
119
-
120
-
121
-
122
-
123
-
124
-
125
-
126
-
127
-
128
-
129
-
130
-
131
-
132
-
133
-
134
-
135
-
136
-
137
-
138
-
139
-
140
-
141
-
142
-
143
-
144
-
145
-
146
-
147
-
148
-
149
-
150
-
151
-
152
-
153
-
154
-
155
-
156
-
157
-
158
-
159
-
160
-
161
-
162
-
163
-
164
-
165
-
166
-
167
-
168
-
169
-
170
-
171
-
172
-
173
-
174
-
175
-
176
-
177
-
178
-
179
-
180
-
181
-
182
-
183
-
184
-
185
-
186
-
187
-
188
-
189
-
190
-
191
-
192
-
193
-
194
-
195
-
196
-
197
-
198
-
199
-
200
-
201
-
202
-
203
-
204
-
205
-
206
-
207
-
208
-
209
-
210
-
211
-
212
-
213
-
214
-
215
-
216
-
217
-
218
-
219
-
220
-
221
-
222
-
223
-
224
-
225
-
226
-
227
-
228
-
229
-
230
-
231
-
232
-
233
-
234
-
235
-
236
-
237
-
238
-
239
-
240
-
241
-
242
-
243
-
244
-
245
-
246
-
247
-
248
-
249
-
250
-
251
-
252
-
253
-
254
-
 255
255 -
 256
256 -
 257
257 -
 258
258 -
 259
259 -
 260
260 -
 261
261 -
 262
262 -
 263
263 -
 264
264 -
 265
265 -
266
 |
 |

B
Mount the Access Point to a Wall or
Ceiling
The access point package includes wall-mounting and ceiling-mounting components.
You can mount the access point to a solid surface (a wall or a ceiling) or to a ceiling with
a 15/16 in. (23.8 mm) T-bar, or you can install the access point freestanding on a flat
surface.
We recommend that you use a flat Ethernet cable so that the cable fits in the narrow
space between the access point and the surface on which it is mounted or placed.
This appendix includes the following sections:
•
Mount
the
access
point
to
a
wall
•
Mount
the
access
point
to
a
solid
ceiling
•
Mount
the
access
point
to
a
T-bar
260