Nokia E62 User Guide - Page 10
Charge the battery, Enter first settings, CD-ROM - for sale
 |
View all Nokia E62 manuals
Add to My Manuals
Save this manual to your list of manuals |
Page 10 highlights
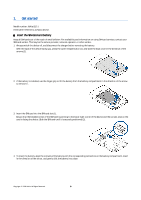
Get started The picture shows the location of the power key. Charge the battery 1. Connect the charger to a wall outlet. 2. Connect the charger to the bottom of the device. If you have a battery charger adapter, connect the charger to the adapter, and the adapter to the bottom of the device. 3. Connect the power cord to the battery charger adapter. The battery indicator bar starts scrolling on the display. If the battery is completely discharged, it may take a few minutes before the charging indicator is shown. The device can be used while charging. 4. When the battery is fully charged, the bar stops scrolling. Disconnect the charger from the device, then from the outlet. When the battery charge level is too low for operation, the device switches itself off. Enter first settings When you power on the device for the first time, or when you switch on the device after the battery has been removed for a longer period, your device asks for a city, time, and date. You can change these settings later in Clock. 1. Select the city in which you are located from the list and OK. To browse for a city, start to type the name of the city, or scroll to a city. It is important to select the correct city, because scheduled calendar entries that you create can change if the new city is located on a different time zone. 2. Set the time, and select OK. 3. Set the date, and select OK. CD-ROM The sales package CD-ROM is compatible with Windows 98SE, Windows ME, Windows 2000, and Windows XP. You can install Nokia PC Suite from the CD-ROM. Nokia PC Suite can be used only with Windows 2000 and Windows XP. Copyright © 2006 Nokia. All Rights Reserved. 10
-
 1
1 -
2
-
3
-
4
-
 5
5 -
 6
6 -
 7
7 -
 8
8 -
 9
9 -
 10
10 -
 11
11 -
 12
12 -
 13
13 -
 14
14 -
 15
15 -
16
-
17
-
18
-
19
-
20
-
21
-
22
-
23
-
24
-
25
-
26
-
27
-
28
-
29
-
30
-
31
-
32
-
33
-
34
-
35
-
36
-
37
-
38
-
39
-
40
-
41
-
42
-
43
-
44
-
45
-
46
-
47
-
48
-
49
-
50
-
51
-
52
-
53
-
54
-
55
-
56
-
57
-
58
-
59
-
60
-
61
-
62
-
63
-
64
-
65
-
66
-
67
-
68
-
69
-
70
-
71
-
72
-
73
-
74
-
75
-
76
-
77
-
78
-
79
-
80
-
81
-
82
-
83
-
84
-
85
-
86
-
87
-
88
-
89
-
90
-
91
-
92
-
93
-
94
-
95
-
96
-
97
-
98
-
99
-
100
-
101
-
102
-
103
-
104
-
105
-
106
-
107
-
108
-
109
-
110
-
111
-
112
-
113
-
114
-
115
-
116
-
117
-
118
-
119
-
120
-
121
-
122
-
123
-
124
-
125
-
126
-
127
-
128
-
129
-
130
-
131
-
132
-
133
-
134
-
135
-
136
-
137
-
138
-
139
-
140
-
141
-
142
-
143
-
144
-
145
-
146
-
147
-
148
-
149
-
150
-
151
-
152
-
153
-
154
-
155
-
156
-
157
-
158
-
159
-
160
-
161
-
162
-
163
-
164
-
165
-
166
-
167
-
168
-
169
-
170
-
171
-
172
-
173
-
174
-
175
-
176
-
177
-
178
-
179
-
180
-
181
-
182
-
183
-
184
-
185
-
186
-
187
-
188
-
189
-
190
-
191
-
192
-
193
-
194
-
195
-
196
-
197
-
198
-
199
-
200
 |
 |
