Nokia N900 User Guide - Page 11
Keys and parts - for sale
 |
UPC - 758478018729
View all Nokia N900 manuals
Add to My Manuals
Save this manual to your list of manuals |
Page 11 highlights
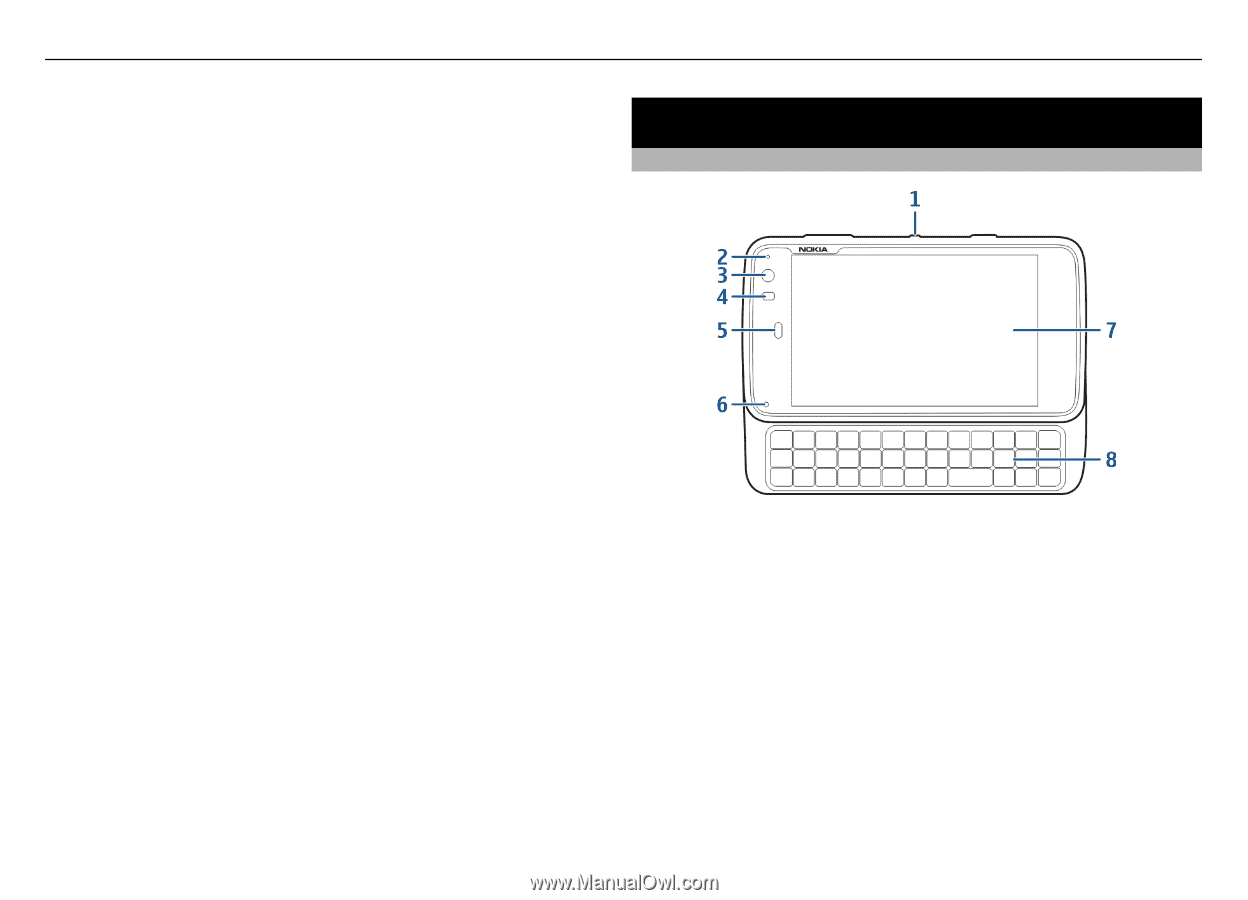
Keys and parts 11 before the indicator light starts blinking or before any calls can be made. Charge the battery using the USB cable You can charge your device using a compatible USB device, for example a computer, when a wall outlet is not available. You can also transfer data while charging the device. 1 Connect a compatible USB cable between a compatible USB device and your device. Depending on the type of device that is used for charging , it may take a while for charging to start. 2 If your device is switched on, USB mode options are displayed. Select Mass storage mode or PC Suite mode to make sure that your device receives enough power from USB charging. The indicator light blinks when the device is charging. The indicator light stays lit when the battery is fully charged. If the battery is completely discharged, allow some time for charging before using your device. If your device is on and you have many applications running, the device can consume more power than it receives from USB charging. Close some of the applications and disconnect data connections, or use the charger that comes with the sales package. Keys and parts Keys and parts (front) 1 Power key 2 Light sensor 3 Secondary camera lens 4 Proximity sensor 5 Earpiece 6 Indicator light 7 Touch screen 8 Physical keyboard To ensure proper functionality of the touch screen, remove the protective film from the device display. Do not cover the area left of the touch screen with, for example, protective film or tape.
-
 1
1 -
2
-
3
-
4
-
5
-
 6
6 -
 7
7 -
 8
8 -
 9
9 -
 10
10 -
 11
11 -
 12
12 -
 13
13 -
 14
14 -
 15
15 -
 16
16 -
17
-
18
-
19
-
20
-
21
-
22
-
23
-
24
-
25
-
26
-
27
-
28
-
29
-
30
-
31
-
32
-
33
-
34
-
35
-
36
-
37
-
38
-
39
-
40
-
41
-
42
-
43
-
44
-
45
-
46
-
47
-
48
-
49
-
50
-
51
-
52
-
53
-
54
-
55
-
56
-
57
-
58
-
59
-
60
-
61
-
62
-
63
-
64
-
65
-
66
-
67
-
68
-
69
-
70
-
71
-
72
-
73
-
74
-
75
-
76
-
77
-
78
-
79
-
80
-
81
-
82
-
83
-
84
-
85
-
86
-
87
-
88
-
89
-
90
-
91
-
92
-
93
-
94
-
95
-
96
-
97
-
98
-
99
-
100
-
101
-
102
-
103
-
104
-
105
-
106
-
107
-
108
-
109
-
110
-
111
 |
 |