Oki MICROLINE 390 TURBO Printer Handbook - Page 12
Installing Ribbon Cartridge
 |
View all Oki MICROLINE 390 TURBO manuals
Add to My Manuals
Save this manual to your list of manuals |
Page 12 highlights
knob Paper separator 3. Hold the knob and remove the paper separator. Protictive material "∆"mark Paper separator 4. Remove the protective material. "∆"mark 5. Set and attach the post to the"∆"mark of the upper cover and the paper separator. Protictive material 6. Remove the protective material from the pull-up roller assembly. Pull-up roller assembly Installing Ribbon Cartridge Center printhead on platen 1. With access cover open, grasp printhead and slide it until it is centered on platen. 2. Remove ribbon cartridge from its packaging. Important! Leave the clear plastic rib- bon shield on the cartridge! ML390/391 Turbo Printer Handbook 5
-
 1
1 -
2
-
3
-
4
-
5
-
6
-
 7
7 -
 8
8 -
 9
9 -
 10
10 -
 11
11 -
 12
12 -
 13
13 -
 14
14 -
 15
15 -
 16
16 -
 17
17 -
18
-
19
-
20
-
21
-
22
-
23
-
24
-
25
-
26
-
27
-
28
-
29
-
30
-
31
-
32
-
33
-
34
-
35
-
36
-
37
-
38
-
39
-
40
-
41
-
42
-
43
-
44
-
45
-
46
-
47
-
48
-
49
-
50
-
51
-
52
-
53
-
54
-
55
-
56
-
57
-
58
-
59
-
60
-
61
-
62
-
63
-
64
-
65
-
66
-
67
-
68
-
69
-
70
-
71
-
72
-
73
-
74
-
75
-
76
-
77
-
78
-
79
-
80
-
81
-
82
-
83
-
84
-
85
-
86
-
87
-
88
-
89
-
90
-
91
-
92
-
93
-
94
-
95
-
96
-
97
-
98
-
99
-
100
-
101
-
102
-
103
-
104
-
105
-
106
-
107
-
108
-
109
-
110
-
111
-
112
-
113
-
114
-
115
-
116
-
117
-
118
-
119
-
120
-
121
-
122
-
123
-
124
-
125
-
126
-
127
-
128
-
129
-
130
-
131
-
132
-
133
-
134
-
135
 |
 |

ML390/391 Turbo Printer Handbook
5
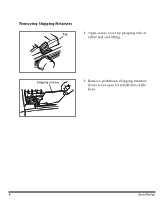
3.
Hold the knob and remove the paper
separator.
4.
Remove the protective material.
5.
Set and attach the post to the“
∆
”mark
of the upper cover and the paper sepa-
rator.
6.
Remove the protective material from
the pull-up roller assembly.
Installing Ribbon Cartridge
1. With access cover open, grasp print-
head and slide it until it is centered on
platen.
2.
Remove ribbon cartridge from its pack-
aging.
Important!
Leave the clear plastic rib-
bon shield on the cartridge!
Pull-up roller
assembly
Protictive
material
Protictive
material
Paper separator
Paper
separator
”
∆
”mark
”
∆
”mark
knob
Center
printhead
on platen