Oki MICROLINE 390 TURBO Printer Handbook - Page 13
Making Connections
 |
View all Oki MICROLINE 390 TURBO manuals
Add to My Manuals
Save this manual to your list of manuals |
Page 13 highlights
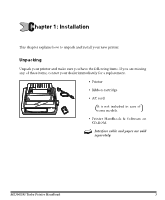
Ribbon shield Knob 3. Holding ribbon cartridge with knob facing up and ribbon sheild facing platen, fit grooves on either side at back end of cartridge over pins on ribbon plate. Setting Headgap lever Number of position sheets 1 1 1 2 2 2 3 3 3 4 4 4 5 5 envelopes or extra-thick paper 1 2 3 4 5 Headgap lever Printhead Knob 4. Lower front of cartridge over printhead until it snaps into place, then turn knob in direction of arrow (clockwise) to take up ribbon slack. 5. The headgap lever by the side of cartridge adjusts for different paper thicknesses. Set it for the number of sheets in the forms you're using from 1 to 4; use setting 5 for envelopes or extra-thick paper. Adjust the setting up or down for the best print quality. Note: When the setting is set at 2~5, the printer automatically slows down for better print quality with thicker multipart forms. Important! Be sure to use only ribbons specifically for use with MICROLINE 390 series. For best results, use genuine OKI ribbons. Making Connections Connection with Computer There instructions are for the standard parallel interface and USB Interface. Instructions for installation/connection of a serial interface are included with the serial interface accessory. For more information on the serial interface accessory, see Chapter 5. 6 Installation
-
 1
1 -
2
-
3
-
4
-
5
-
6
-
7
-
 8
8 -
 9
9 -
 10
10 -
 11
11 -
 12
12 -
 13
13 -
 14
14 -
 15
15 -
 16
16 -
 17
17 -
 18
18 -
19
-
20
-
21
-
22
-
23
-
24
-
25
-
26
-
27
-
28
-
29
-
30
-
31
-
32
-
33
-
34
-
35
-
36
-
37
-
38
-
39
-
40
-
41
-
42
-
43
-
44
-
45
-
46
-
47
-
48
-
49
-
50
-
51
-
52
-
53
-
54
-
55
-
56
-
57
-
58
-
59
-
60
-
61
-
62
-
63
-
64
-
65
-
66
-
67
-
68
-
69
-
70
-
71
-
72
-
73
-
74
-
75
-
76
-
77
-
78
-
79
-
80
-
81
-
82
-
83
-
84
-
85
-
86
-
87
-
88
-
89
-
90
-
91
-
92
-
93
-
94
-
95
-
96
-
97
-
98
-
99
-
100
-
101
-
102
-
103
-
104
-
105
-
106
-
107
-
108
-
109
-
110
-
111
-
112
-
113
-
114
-
115
-
116
-
117
-
118
-
119
-
120
-
121
-
122
-
123
-
124
-
125
-
126
-
127
-
128
-
129
-
130
-
131
-
132
-
133
-
134
-
135
 |
 |
