Onkyo TX-NR626 Owner's Manual English - Page 13
En-13, Connecting the Speaker Cables/Powered Subwoofers - no sound
 |
View all Onkyo TX-NR626 manuals
Add to My Manuals
Save this manual to your list of manuals |
Page 13 highlights
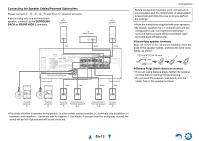
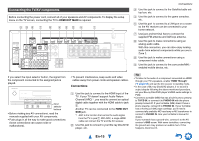
Connecting the Speaker Cables/Powered Subwoofers Please connect B , C , D , E , F and G for 5.1-channel surround. If you're using only one surround back speaker, connect it to the SURROUND BACK or FRONT HIGH L terminals. C Front speaker R D Center speaker B Front speaker L Red Green White Gray Tan Brown Blue Connections Before connecting the power cord, connect all of your speakers and AV components. A setup wizard is launched upon first-time use to let you perform the settings. • Read the instructions supplied with your speakers. • By default, speakers for 7.1-channel surround are configured to use: front right/front left/center/ surround right/surround left/surround back right/ surround back left/subwoofer. ■ Screw-type speaker terminals Strip 1/2" to 5/8" (12 to 15 mm) of insulation from the ends of the speaker cables, and twist the bare wires tightly, as shown. 1/2" to 5/8" (12 to 15 mm) ■ Banana Plugs (North American models) • If you are using banana plugs, tighten the speaker terminal before inserting the banana plug. • Do not insert the speaker code directly into the center hole of the speaker terminal. Powered subwoofer G Powered subwoofer G Surround speaker R F Surround back or Front high speaker R ) + Surround back or Front high speaker L ( * Surround speaker L E • Pay close attention to speaker wiring polarity. In other words, connect positive (+) terminals only to positive (+) terminals, and negative (-) terminals only to negative (-) terminals. If you get them the wrong way around, the sound will be out of phase and will sound unnatural. En-13
-
 1
1 -
2
-
3
-
4
-
5
-
6
-
7
-
 8
8 -
 9
9 -
 10
10 -
 11
11 -
 12
12 -
 13
13 -
 14
14 -
 15
15 -
 16
16 -
 17
17 -
 18
18 -
19
-
20
-
21
-
22
-
23
-
24
-
25
-
26
-
27
-
28
-
29
-
30
-
31
-
32
-
33
-
34
-
35
-
36
-
37
-
38
-
39
-
40
-
41
-
42
-
43
-
44
-
45
-
46
-
47
-
48
-
49
-
50
-
51
-
52
-
53
-
54
-
55
-
56
-
57
-
58
-
59
-
60
-
61
-
62
-
63
-
64
-
65
-
66
-
67
-
68
-
69
-
70
-
71
-
72
-
73
-
74
-
75
-
76
-
77
-
78
-
79
-
80
-
81
-
82
-
83
-
84
-
85
-
86
-
87
-
88
-
89
-
90
-
91
-
92
-
93
-
94
-
95
-
96
-
97
-
98
-
99
-
100
-
101
-
102
-
103
-
104
-
105
-
106
-
107
-
108
-
109
-
110
-
111
-
112
-
113
-
114
-
115
-
116
-
117
-
118
-
119
-
120
-
121
-
122
-
123
-
124
-
125
-
126
-
127
-
128
-
129
-
130
-
131
-
132
-
133
-
134
-
135
-
136
-
137
-
138
-
139
-
140
 |
 |
