Onkyo TX-NR626 Owner's Manual English - Page 22
Firmware Update Notification, About the HYBRID STANDBY indicator, Initial Setup
 |
View all Onkyo TX-NR626 manuals
Add to My Manuals
Save this manual to your list of manuals |
Page 22 highlights
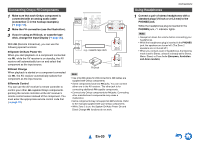
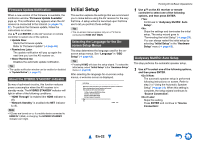
Firmware Update Notification When a new version of the firmware is available, the notification window "Firmware Update Available" pops up. This notification only appears when the AV receiver is connected to the Internet (➔ pages 16, 27). To perform the firmware update, follow the instructions on screen. Use R/X and ENTER on the AV receiver or remote controller to select one of the options. ` Update Now: Starts the firmware update. Refer to "Firmware Update" (➔ page 85). ` Remind me Later: The update notification will pop up again the next time you turn the AV receiver on. ` Never Remind me: Disables the automatic update notification. Tip • The update notification window can be enabled or disabled in "Update Notice" (➔ page 67). About the HYBRID STANDBY indicator By way of optimized circuitry, this function reduces power consumption when the AV receiver is in standby mode. The HYBRID STANDBY indicator will light in either of the following conditions: -"HDMI Through" is enabled (the HDMI indicator is off). -"Network Standby" is enabled (the NET indicator is off). Note • If Zones are turned on or, if a mobile device connected to HDMI IN 1 (MHL) is charging, the HYBRID STANDBY indicator won't light. Initial Setup This section explains the settings that we recommend you to make before using the AV receiver for the very first time. A setup wizard is launched upon first-time use to let you perform those settings. Tip • The on-screen menus appear only on a TV that is connected to HDMI OUT MAIN. Selecting the Language for the Onscreen Setup Menus This step determines the language used for the onscreen setup menus. See "Language" in "OSD Setup" (➔ page 64). Tip • Pressing HOME will close the setup wizard. To restart the initial setup, select "Initial Setup" in the "Hardware Setup" menu (➔ page 68). After selecting the language for on-screen setup menus, a welcome screen is displayed. Initial Setup Welcome to initial setup. Have you connected all the speakers and devices? Before starting, please connect speakers and sources. Now, would you like to start initial setup? 1st Step : Audyssey MultEQ: Auto Setup 2nd Step : Source Connection 3rd Step : Remote Mode Setup 4th Step : Network Connection Yes No HOME Exit Turning On & Basic Operations 1 Use R/X on the AV receiver or remote controller to select one of the following options, and then press ENTER. ` Yes: Continues to "Audyssey MultEQ: Auto Setup". ` No: Skips the settings and terminates the initial setup. The setup wizard goes to "Terminating the Initial Setup" (➔ page 23). You can always restart the initial setup by selecting "Initial Setup" in the "Hardware Setup" menu (➔ page 68). Audyssey MultEQ: Auto Setup This step performs the automatic speaker setup. 1 Use R/X to select one of the following options, and then press ENTER. ` Do it Now: The automatic speaker setup is performed following instructions on screen. Refer to step 2 of "Using the Automatic Speaker Setup" (➔ page 24). When this setting is complete, the setup wizard continues to "Source Connection". ` Do it Later: Skips this setting. Press ENTER and continue to "Source Connection". En-22
-
 1
1 -
2
-
3
-
4
-
5
-
6
-
7
-
8
-
9
-
10
-
11
-
12
-
13
-
14
-
15
-
16
-
 17
17 -
 18
18 -
 19
19 -
 20
20 -
 21
21 -
 22
22 -
 23
23 -
 24
24 -
 25
25 -
 26
26 -
 27
27 -
28
-
29
-
30
-
31
-
32
-
33
-
34
-
35
-
36
-
37
-
38
-
39
-
40
-
41
-
42
-
43
-
44
-
45
-
46
-
47
-
48
-
49
-
50
-
51
-
52
-
53
-
54
-
55
-
56
-
57
-
58
-
59
-
60
-
61
-
62
-
63
-
64
-
65
-
66
-
67
-
68
-
69
-
70
-
71
-
72
-
73
-
74
-
75
-
76
-
77
-
78
-
79
-
80
-
81
-
82
-
83
-
84
-
85
-
86
-
87
-
88
-
89
-
90
-
91
-
92
-
93
-
94
-
95
-
96
-
97
-
98
-
99
-
100
-
101
-
102
-
103
-
104
-
105
-
106
-
107
-
108
-
109
-
110
-
111
-
112
-
113
-
114
-
115
-
116
-
117
-
118
-
119
-
120
-
121
-
122
-
123
-
124
-
125
-
126
-
127
-
128
-
129
-
130
-
131
-
132
-
133
-
134
-
135
-
136
-
137
-
138
-
139
-
140
 |
 |
