Onkyo TX-NR626 Owner's Manual English - Page 19
Connecting the Antennas, En-19 - release
 |
View all Onkyo TX-NR626 manuals
Add to My Manuals
Save this manual to your list of manuals |
Page 19 highlights
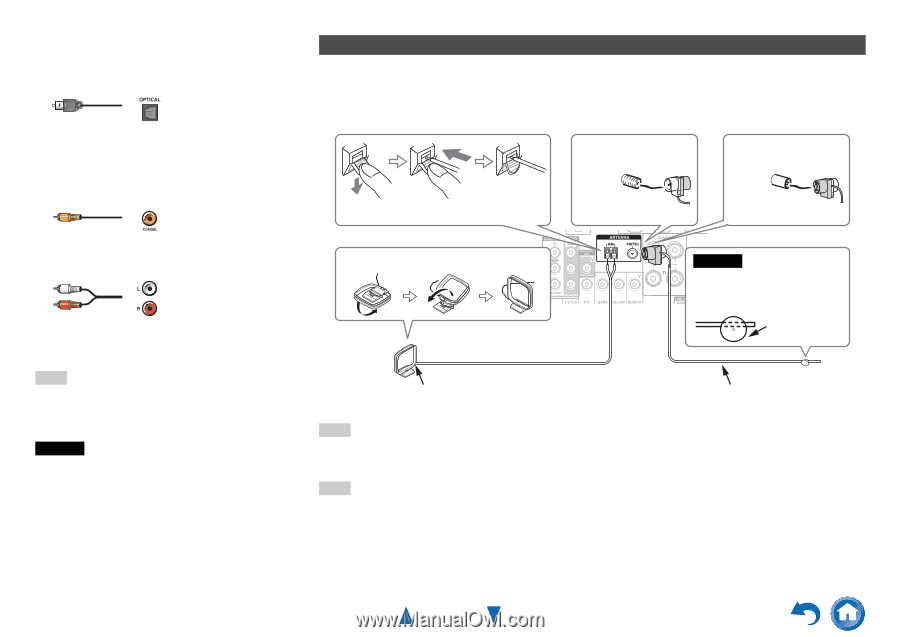
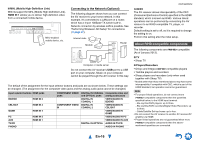
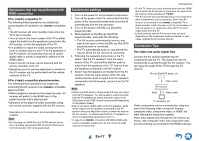
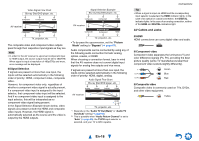
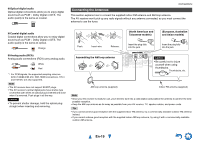
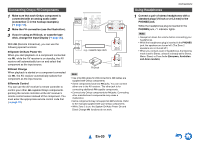
■ Optical digital audio Optical digital connections allow you to enjoy digital sound such as PCM*1, Dolby Digital or DTS. The audio quality is the same as coaxial. Connections Connecting the Antennas This section explains how to connect the supplied indoor FM antenna and AM loop antenna. The AV receiver won't pick up any radio signals without any antenna connected, so you must connect the antenna to use the tuner. ■ Coaxial digital audio Coaxial digital connections allow you to enjoy digital sound such as PCM*1, Dolby Digital or DTS. The audio quality is the same as optical. Orange Push. Insert wire. Release. (North American and Taiwanese models) Insert the plug fully into the jack. (European, Australian and Asian models) Insert the plug fully into the jack. ■ Analog audio (RCA) Analog audio connections (RCA) carry analog audio. White Red *1 For PCM signals, the supported sampling rates are 32/44.1/48/88.2/96 kHz. With HDMI connections, 176.4 and 192 kHz are also supported. Note • The AV receiver does not support SCART plugs. • The AV receiver's optical digital jacks have shutter-type covers that open when an optical plug is inserted and close when it's removed. Push plugs in all the way. Caution • To prevent shutter damage, hold the optical plug straight when inserting and removing. Assembling the AM loop antenna Caution • Be careful not to injure yourself when using thumbtacks. Thumbtacks, etc. AM loop antenna (supplied) Indoor FM antenna (supplied) Note • Once your AV receiver is ready for use, you'll need to tune into a radio station and position the antenna to achieve the best possible reception. • Keep the AM loop antenna as far away as possible from your AV receiver, TV, speaker cables, and power cords. Tip • If you cannot achieve good reception with the supplied indoor FM antenna, try a commercially available outdoor FM antenna instead. • If you cannot achieve good reception with the supplied indoor AM loop antenna, try using it with a commercially available outdoor AM antenna. En-19
-
 1
1 -
2
-
3
-
4
-
5
-
6
-
7
-
8
-
9
-
10
-
11
-
12
-
13
-
 14
14 -
 15
15 -
 16
16 -
 17
17 -
 18
18 -
 19
19 -
 20
20 -
 21
21 -
 22
22 -
 23
23 -
 24
24 -
25
-
26
-
27
-
28
-
29
-
30
-
31
-
32
-
33
-
34
-
35
-
36
-
37
-
38
-
39
-
40
-
41
-
42
-
43
-
44
-
45
-
46
-
47
-
48
-
49
-
50
-
51
-
52
-
53
-
54
-
55
-
56
-
57
-
58
-
59
-
60
-
61
-
62
-
63
-
64
-
65
-
66
-
67
-
68
-
69
-
70
-
71
-
72
-
73
-
74
-
75
-
76
-
77
-
78
-
79
-
80
-
81
-
82
-
83
-
84
-
85
-
86
-
87
-
88
-
89
-
90
-
91
-
92
-
93
-
94
-
95
-
96
-
97
-
98
-
99
-
100
-
101
-
102
-
103
-
104
-
105
-
106
-
107
-
108
-
109
-
110
-
111
-
112
-
113
-
114
-
115
-
116
-
117
-
118
-
119
-
120
-
121
-
122
-
123
-
124
-
125
-
126
-
127
-
128
-
129
-
130
-
131
-
132
-
133
-
134
-
135
-
136
-
137
-
138
-
139
-
140
 |
 |