Onkyo TX-SR601 Owner Manual - Page 10
TUNER, CD, and PHONO TX-SR701/701E only - used
 |
View all Onkyo TX-SR601 manuals
Add to My Manuals
Save this manual to your list of manuals |
Page 10 highlights
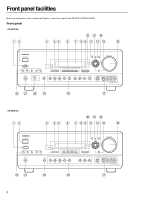
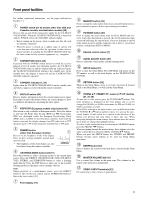
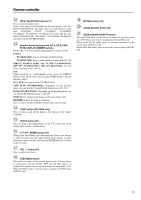
Front panel facilities Input source buttons (DVD, VIDEO 1-4, TAPE, TUNER, CD, and PHONO (TX-SR701/701E only)) [41] These buttons are used to select the input source. Press these buttons to select the input source for the main zone. To select the input source for the remote zone (Zone 2) or recording out (Rec Out), first press the ZONE 2 or REC OUT button, and then press the desired input source button. The input channel with its indicator lit red is output to REC OUT and the one with its indicator lit green is output to ZONE 2. AUDIO SELECTOR button [42] Press to select the type of audio input signal. DIRECT/PURE AUDIO button and indicator (TX-SR701/701E only) [46, 48] PHONES jack [44] This is a standard stereo jack for connecting stereo headphones. REC OUT, ZONE 2, OFF, LEVEL / buttons, and ZONE 2 indicator [60, 61] The REC OUT and ZONE 2 buttons allow you to use the TXSR701/701E/601/601E to output to a remote zone (Zone 2) or to another component for recording (Rec Out). To turn off the output, press the OFF button. The ZONE 2 indicator lights when a signal is output to the remote zone (Zone 2). When the ZONE 2 indicator is off, then either output to the remote zone is turned off or Rec Out is selected. Press the LEVEL / buttons to enter the mode for adjusting the volume in the remote zone (Zone 2). Note: The Rec Out and Zone 2 buttons use the same circuit and therefore cannot be used at the same time. When REC OUT is selected, nothing is output to Zone 2. When ZONE 2 is selected, REC OUT is automatically fixed to SOURCE. 10
-
 1
1 -
2
-
3
-
4
-
 5
5 -
 6
6 -
 7
7 -
 8
8 -
 9
9 -
 10
10 -
 11
11 -
 12
12 -
 13
13 -
 14
14 -
 15
15 -
16
-
17
-
18
-
19
-
20
-
21
-
22
-
23
-
24
-
25
-
26
-
27
-
28
-
29
-
30
-
31
-
32
-
33
-
34
-
35
-
36
-
37
-
38
-
39
-
40
-
41
-
42
-
43
-
44
-
45
-
46
-
47
-
48
-
49
-
50
-
51
-
52
-
53
-
54
-
55
-
56
-
57
-
58
-
59
-
60
-
61
-
62
-
63
-
64
-
65
-
66
-
67
-
68
-
69
-
70
-
71
-
72
-
73
-
74
-
75
-
76
-
77
-
78
-
79
-
80
 |
 |