Onkyo TX-SR601 Owner Manual - Page 36
Buttons used for navigating through the menus
 |
View all Onkyo TX-SR601 manuals
Add to My Manuals
Save this manual to your list of manuals |
Page 36 highlights
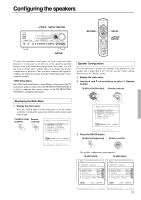
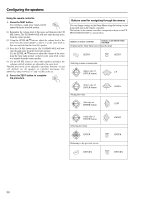
Configuring the speakers Using the remote controller 1. Press the TEST button. You will hear a pink noise which will be emitted from the front left speaker. (1) Remember the volume level of this noise and then press the CH SEL button. The TX-SR601/601E will now emit the pink noise from the center speaker. (2) Using the LEVEL / buttons, adjust the volume level of the noise from the center speaker so that it is at the same level as that was emitted from the front left speaker. (3) Press the CH SEL button again. The TX-SR601/601E will now emit the pink noise from the front right speaker. Use the LEVEL / buttons to adjust the volume of the noise from the front right speaker so that it is the same level as that was emitted from the center speaker. (4) Use the CH SEL button to select other speakers and adjust the volumes until all speakers are adjusted to the same level. The pink noise level can be adjusted to anywhere between -12 and +12 decibels for all speakers in 1-decibel increments. For subwoofer, values between -15 and +12 dB can be set. 2. Press the TEST button to complete the procedure. Buttons used for navigating through the menus You can change settings in the Setup Menu using the buttons on the front panel and on the remote controller. The buttons on the remote controller correspond to those on the TXSR701/701E/601/601E as shown below. Buttons on remote controller Buttons on TX-SR701/701E/ 601/601E Displaying the Main Menu and exiting the menu SETUP SETUP Selecting a menu or menu item (upper edge of UP ENTER button) (lower edge of ENTER button) DOWN Setting the value (left edge of ENTER button) LEFT (right edge of ENTER button) Selecting the menu ENTER Returning to the previous screen RETURN RIGHT ENTER RETURN 36
-
 1
1 -
2
-
3
-
4
-
5
-
6
-
7
-
8
-
9
-
10
-
11
-
12
-
13
-
14
-
15
-
16
-
17
-
18
-
19
-
20
-
21
-
22
-
23
-
24
-
25
-
26
-
27
-
28
-
29
-
30
-
 31
31 -
 32
32 -
 33
33 -
 34
34 -
 35
35 -
 36
36 -
 37
37 -
 38
38 -
 39
39 -
 40
40 -
 41
41 -
42
-
43
-
44
-
45
-
46
-
47
-
48
-
49
-
50
-
51
-
52
-
53
-
54
-
55
-
56
-
57
-
58
-
59
-
60
-
61
-
62
-
63
-
64
-
65
-
66
-
67
-
68
-
69
-
70
-
71
-
72
-
73
-
74
-
75
-
76
-
77
-
78
-
79
-
80
 |
 |
