Onkyo TX-SR876 Owner Manual - Page 123
Connecting the AV Receiver, Playing Music Files on a Server, Press the [NET/USB] REMOTE - tx av receiver
 |
UPC - 751398008337
View all Onkyo TX-SR876 manuals
Add to My Manuals
Save this manual to your list of manuals |
Page 123 highlights
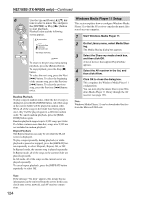
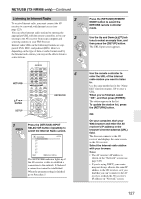
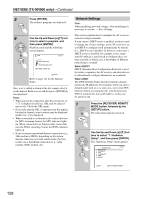
NET/USB (TX-NR906 only)-Continued Connecting the AV Receiver To connect the AV receiver to your home network, plug one end of a shielded CAT5 Ethernet cable into the AV receiver's ETHERNET port, and plug the other end into a LAN port on your router or switch. The following diagram shows how you can connect the AV receiver to your home network. In this example, it's connected to a LAN port on a router, which has a 4-port 100Base-TX switch built-in. TX-NR906 Internet radio ETHERNET Playing Music Files on a Server This section explains how to play music files on a computer or media server through the AV receiver. See page 121 for details on supported music servers and music file formats. 1 Start your computer or media server. 2 Press the [NET/USB] INPUT SELECTOR button to select the Server screen. Server Server1: Shared1 server: MYPC Modem Router WAN port LAN port LAN port LAN/Ethernet port Computer or media server NET/USB USB/iRADIO RETURN REFRESH 1 / 5 The NETWORK indicator lights up if the AV receiver is able to establish a connection to the server. It flashes if a connection cannot be established. 3 Press the [NET/USB] REMOTE MODE button to select the NET/USB remote controller mode. 4 Use the Up and Down [R]/[X] but- tons to select a server, and then press [ENTER]. A list of items on the server appears. Server1: Shared1 Recently Added Artists Album Songs Genre Year Rating NET/USB USB/iRADIO RETURN REFRESH 1 / 10 5 Use the Up and Down [R]/[X] but- tons to select an item, and then press [ENTER]. A list of music files appears. All Music Song 1 Song 2 Song 3 My favorite song 1 My favorite song 2 My favorite song 3 My favorite song 4 My favorite song 5 My favorite song 6 My favorite song 7 NET/USB USB/iRADIO RETURN RETURN 1 / 11 123
-
 1
1 -
2
-
3
-
4
-
5
-
6
-
7
-
8
-
9
-
10
-
11
-
12
-
13
-
14
-
15
-
16
-
17
-
18
-
19
-
20
-
21
-
22
-
23
-
24
-
25
-
26
-
27
-
28
-
29
-
30
-
31
-
32
-
33
-
34
-
35
-
36
-
37
-
38
-
39
-
40
-
41
-
42
-
43
-
44
-
45
-
46
-
47
-
48
-
49
-
50
-
51
-
52
-
53
-
54
-
55
-
56
-
57
-
58
-
59
-
60
-
61
-
62
-
63
-
64
-
65
-
66
-
67
-
68
-
69
-
70
-
71
-
72
-
73
-
74
-
75
-
76
-
77
-
78
-
79
-
80
-
81
-
82
-
83
-
84
-
85
-
86
-
87
-
88
-
89
-
90
-
91
-
92
-
93
-
94
-
95
-
96
-
97
-
98
-
99
-
100
-
101
-
102
-
103
-
104
-
105
-
106
-
107
-
108
-
109
-
110
-
111
-
112
-
113
-
114
-
115
-
116
-
117
-
 118
118 -
 119
119 -
 120
120 -
 121
121 -
 122
122 -
 123
123 -
 124
124 -
 125
125 -
 126
126 -
 127
127 -
 128
128 -
129
-
130
-
131
-
132
-
133
-
134
-
135
-
136
-
137
-
138
-
139
-
140
-
141
-
142
-
143
-
144
-
145
-
146
-
147
-
148
-
149
-
150
 |
 |
