Onkyo TX-SR876 Owner Manual - Page 55
Monitor Out Setup
 |
UPC - 751398008337
View all Onkyo TX-SR876 manuals
Add to My Manuals
Save this manual to your list of manuals |
Page 55 highlights
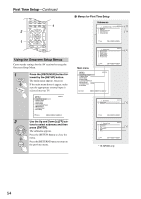
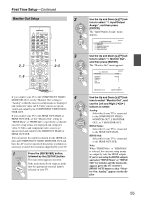
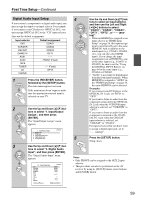
First Time Setup-Continued Monitor Out Setup 2 2, 3 1, 6 ON STANDBY TV INPUT DVD 1 VCR/DVR CBL/SAT 2 3 GAME/TV 4 AUX1 5 AUX2 6 + TV CH - TAPE TUNER CD 7 8 9 PHONO NET/USB D. TUN TV VOL +10 0 CLEAR --/--- 10 11 12 INPUT SELECTOR MACRO 1 2 3 ZONE3 DVD REMOTE MODE VCR CD ZONE2 CDR/MD/DOCK TV DIMMER + CH DISC ALBUM - PREV CH DISPLAY CABLE SAT TOP MENU NET/USB RECEIVER TAPE/AMP SLEEP MENU ENTER VOL GUIDE SETUP EXIT RETURN MUTING 1 2-5 3 REC PLAYLIST RANDOM STEREO SP A SP B LISTENING MODE SURR REPEAT AUDIO SUBTITLE PLAY MODE PURE A DIRECT THX ALL ST If you connect your TV to the COMPONENT VIDEO 4 MONITOR OUT, set the "Monitor Out" setting to "Analog" so that the onscreen setup menus are displayed and composite video and S-Video sources are upcon- verted and output by the COMPONENT VIDEO MON- ITOR OUT. If you connect your TV to the HDMI OUT MAIN or HDMI OUT SUB, set the "Monitor Out" setting to "HDMI Main" or "HDMI Sub", respectively, so that the onscreen setup menus are displayed and composite video, S-Video, and component video sources are upconverted and output by the HDMI OUT MAIN or HDMI OUT SUB. You can specify the output resolution for the HDMI outputs and COMPONENT VIDEO MONITOR OUT and have the AV receiver upconvert the picture resolution as necessary to match the resolution supported by your TV. 1 Press the [RECEIVER] button, followed by the [SETUP] button. The main menu appears onscreen. If the main menu doesn't appear, make sure the appropriate external input is selected on your TV. Use the Up and Down [R]/[X] buttons to select "1. Input/Output Assign", and then press [ENTER]. The "Input/Output Assign" menu appears. 1. Input/Output Assign 1. Monitor Out 2. HDMI Input 3. Component Video Input 4. Digital Audio Input 5. Analog Audio Input Use the Up and Down [R]/[X] buttons to select "1. Monitor Out", and then press [ENTER]. The "Monitor Out" menu appears. 1-1. Monitor Out Monitor Out Resolution Brightness Contrast Hue Saturation Analog Through 0 0 0 MOVE VALUE RETURN RETURN SETUP EXIT Use the Up and Down [R]/[X] buttons to select "Monitor Out", and use the Left and Right [F]/[S] buttons to select: Analog: Select this if your TV is connected to the COMPONENT VIDEO MONITOR OUT, S MONITOR OUT, or V MONITOR OUT. HDMI Main: Select this if your TV is connected to the HDMI OUT MAIN. HDMI Sub: Select this if your TV is connected to the HDMI OUT SUB. Note: When "HDMI Main" or "HDMI Sub" is selected, the onscreen setup menus are output by only the HDMI outputs. If you're not using the HDMI outputs and select "HDMI Main" or "HDMI Sub" by mistake and the menus disappear, press the AV receiver's [HDMI OUT] button so that "Monitor Out: Analog" appears on the display. 55
-
 1
1 -
2
-
3
-
4
-
5
-
6
-
7
-
8
-
9
-
10
-
11
-
12
-
13
-
14
-
15
-
16
-
17
-
18
-
19
-
20
-
21
-
22
-
23
-
24
-
25
-
26
-
27
-
28
-
29
-
30
-
31
-
32
-
33
-
34
-
35
-
36
-
37
-
38
-
39
-
40
-
41
-
42
-
43
-
44
-
45
-
46
-
47
-
48
-
49
-
 50
50 -
 51
51 -
 52
52 -
 53
53 -
 54
54 -
 55
55 -
 56
56 -
 57
57 -
 58
58 -
 59
59 -
 60
60 -
61
-
62
-
63
-
64
-
65
-
66
-
67
-
68
-
69
-
70
-
71
-
72
-
73
-
74
-
75
-
76
-
77
-
78
-
79
-
80
-
81
-
82
-
83
-
84
-
85
-
86
-
87
-
88
-
89
-
90
-
91
-
92
-
93
-
94
-
95
-
96
-
97
-
98
-
99
-
100
-
101
-
102
-
103
-
104
-
105
-
106
-
107
-
108
-
109
-
110
-
111
-
112
-
113
-
114
-
115
-
116
-
117
-
118
-
119
-
120
-
121
-
122
-
123
-
124
-
125
-
126
-
127
-
128
-
129
-
130
-
131
-
132
-
133
-
134
-
135
-
136
-
137
-
138
-
139
-
140
-
141
-
142
-
143
-
144
-
145
-
146
-
147
-
148
-
149
-
150
 |
 |
