Onkyo TX-SR876 Owner Manual - Page 127
Listening to Internet Radio
 |
UPC - 751398008337
View all Onkyo TX-SR876 manuals
Add to My Manuals
Save this manual to your list of manuals |
Page 127 highlights
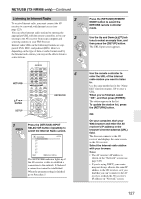
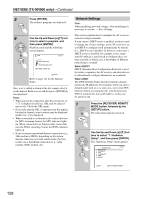
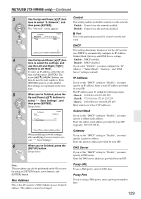
NET/USB (TX-NR906 only)-Continued Listening to Internet Radio 2 To receive Internet radio, you must connect the AV receiver to a network with Internet access (see page 123). You can select Internet radio stations by entering the appropriate URL with the remote controller, or by connecting to the AV receiver from your computer and 3 selecting stations in your Web browser. Internet radio URLs in the following formats are sup- ported: PLS, M3U, and podcast (RSS). However, depending on the type of data or audio format used by the Internet radio station, you may not be able to listen to some stations. NET/USB ENTER SETUP ON STANDBY TV INPUT DVD 1 VCR/DVR CBL/SAT 2 3 GAME/TV 4 AUX1 5 AUX2 6 + TV CH - TAPE TUNER CD 7 8 9 PHONO NET/USB D. TUN TV VOL +10 0 CLEAR --/--- 10 11 12 INPUT SELECTOR MACRO 1 2 3 ZONE3 DVD REMOTE MODE VCR CD ZONE2 CDR/MD/DOCK TV DIMMER + CH DISC ALBUM - PREV CH DISPLAY CABLE SAT TOP MENU NET/USB RECEIVER TAPE/AMP SLEEP MENU ENTER VOL GUIDE SETUP EXIT RETURN MUTING RECEIVER 4 1 Press the [NET/USB] INPUT SELECTOR button repeatedly to select the Internet Radio screen. Internet Radio 1.vTuner Internet Radio 2.--3.--4.--5.--6.--7.--8.--9.--- 10.--- NET/USB RETURN REFRESH SETUP URL The NETWORK indicator lights up if the AV receiver is able to establish a connection to the network. It flashes if a connection cannot be established. When the program setting is finished, go to Procedure 5. Press the [NET/USB] REMOTE MODE button to select the NET/USB remote controller mode. Use the Up and Down [R]/[X] buttons to select an empty item, and then press the [SETUP] button. The URL Input screen appears. Use the remote controller to enter the URL of the Internet radio station you want to listen to. Use the same method as for the "Name Edit" function on page 110 to enter a URL. When you've finished, select "OK", and then press [ENTER]. The station appears in the list. To update the station list, press the [RETURN] button. OR: On your computer, start your Web browser and enter the AV receiver's IP address in the browser's Internet address (URL) field. The browser connects to the AV receiver and displays the same screen as the AV receiver. Select the Internet radio station with your browser. Notes: • The AV receiver's IP address is shown on the "Network" screen (see page 128). • If you're using DHCP, your router may not always allocate the same IP address to the AV receiver, so if you find that you can't connect to the AV receiver, recheck the AV receiver's IP address on "Network" screen. 127
-
 1
1 -
2
-
3
-
4
-
5
-
6
-
7
-
8
-
9
-
10
-
11
-
12
-
13
-
14
-
15
-
16
-
17
-
18
-
19
-
20
-
21
-
22
-
23
-
24
-
25
-
26
-
27
-
28
-
29
-
30
-
31
-
32
-
33
-
34
-
35
-
36
-
37
-
38
-
39
-
40
-
41
-
42
-
43
-
44
-
45
-
46
-
47
-
48
-
49
-
50
-
51
-
52
-
53
-
54
-
55
-
56
-
57
-
58
-
59
-
60
-
61
-
62
-
63
-
64
-
65
-
66
-
67
-
68
-
69
-
70
-
71
-
72
-
73
-
74
-
75
-
76
-
77
-
78
-
79
-
80
-
81
-
82
-
83
-
84
-
85
-
86
-
87
-
88
-
89
-
90
-
91
-
92
-
93
-
94
-
95
-
96
-
97
-
98
-
99
-
100
-
101
-
102
-
103
-
104
-
105
-
106
-
107
-
108
-
109
-
110
-
111
-
112
-
113
-
114
-
115
-
116
-
117
-
118
-
119
-
120
-
121
-
 122
122 -
 123
123 -
 124
124 -
 125
125 -
 126
126 -
 127
127 -
 128
128 -
 129
129 -
 130
130 -
 131
131 -
 132
132 -
133
-
134
-
135
-
136
-
137
-
138
-
139
-
140
-
141
-
142
-
143
-
144
-
145
-
146
-
147
-
148
-
149
-
150
 |
 |
