Onkyo TX-SR876 Owner Manual - Page 128
Network Settings - tx user manual
 |
UPC - 751398008337
View all Onkyo TX-SR876 manuals
Add to My Manuals
Save this manual to your list of manuals |
Page 128 highlights
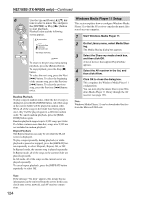
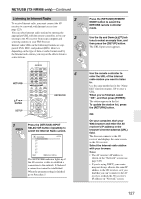
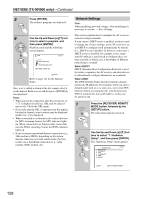
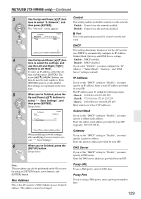
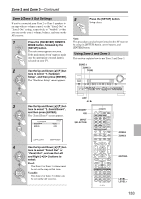
NET/USB (TX-NR906 only)-Continued 5 Press [ENTER]. The station's programs are displayed. 6 Use the Up and Down [R]/[X] but- tons to select a program, and then press [ENTER]. Playback starts and the following screen appears. PLAY 1 / 11 iRadio station name - - Streaming program name MP3 128kbps 16bit/44.1kHz RETURN RETURN Refer to page 121 for the Internet Radio. Once you've added a station to the list, simply select it on the Internet Radio screen, and then press [ENTER] to start playback. Notes: • When you try the connection after the user preset, if "[?]" is displayed in the list, URL may be entered incorrectly. Check the URL again. • Even if the entered URL is improper (not the applicable playlist format), some contents may be displayed. In that case, [?] is displayed. • When connected to an Internet radio station that uses the MP3 streaming format, the MP3 indicator lights up. When connected to an Internet radio station that uses the WMA streaming format, the WMA indicator lights up. • If you're using a narrowband Internet connection (e.g., 56K modem or ISDN), depending on the station, Internet radio may not work satisfactorily. For best results, use a broadband connection (e.g., cable modem, xDSL modem, etc). Network Settings Note: When modifying network settings, after modifying it is necessary to execute Save Settings. This section explains how to configure the AV receiver's network settings manually. If your router's DHCP server is enabled, you don't need to change any of these settings, as the AV receiver is set use DHCP to configure itself automatically by default (i.e., DHCP is set to Enable). If, however, your router's DHCP server is disabled, for example, you're using static IP addresses, you'll need to configure these settings yourself, in which case, a knowledge of Ethernet networking is essential. What's DHCP? DHCP (Dynamic Host Configuration Protocol) is used by routers, computers, the AV receiver, and other devices to automatically configure themselves on a network. What's DNS? The DNS (Domain Name System) translates domain names into IP addresses. For example, when you enter a domain name such as www.onkyousa.com in your Web browser, before accessing the site, your browser uses DNS to translate this into an IP address, in this case 63.148.251.142. 1 Press the [RECEIVER] REMOTE MODE button, followed by the [SETUP] button. The main menu appears onscreen. 2 Use the Up and Down [R]/[X] but- tons to select "7. Hardware Setup", and then press [ENTER]. The "Hardware Setup" menu appears. 7. Hardware Setup 1. Remote Control 2. Zone2/Zone3 3. Tuner 4. Analog Multich 5. HDMI 6. Network MOVE ENTER ENTER RETURN RETURN SETUP EXIT 128
-
 1
1 -
2
-
3
-
4
-
5
-
6
-
7
-
8
-
9
-
10
-
11
-
12
-
13
-
14
-
15
-
16
-
17
-
18
-
19
-
20
-
21
-
22
-
23
-
24
-
25
-
26
-
27
-
28
-
29
-
30
-
31
-
32
-
33
-
34
-
35
-
36
-
37
-
38
-
39
-
40
-
41
-
42
-
43
-
44
-
45
-
46
-
47
-
48
-
49
-
50
-
51
-
52
-
53
-
54
-
55
-
56
-
57
-
58
-
59
-
60
-
61
-
62
-
63
-
64
-
65
-
66
-
67
-
68
-
69
-
70
-
71
-
72
-
73
-
74
-
75
-
76
-
77
-
78
-
79
-
80
-
81
-
82
-
83
-
84
-
85
-
86
-
87
-
88
-
89
-
90
-
91
-
92
-
93
-
94
-
95
-
96
-
97
-
98
-
99
-
100
-
101
-
102
-
103
-
104
-
105
-
106
-
107
-
108
-
109
-
110
-
111
-
112
-
113
-
114
-
115
-
116
-
117
-
118
-
119
-
120
-
121
-
122
-
 123
123 -
 124
124 -
 125
125 -
 126
126 -
 127
127 -
 128
128 -
 129
129 -
 130
130 -
 131
131 -
 132
132 -
 133
133 -
134
-
135
-
136
-
137
-
138
-
139
-
140
-
141
-
142
-
143
-
144
-
145
-
146
-
147
-
148
-
149
-
150
 |
 |
