Onkyo TX-SR876 Owner Manual - Page 65
Measurement Positions, Using Audyssey MultEQ
 |
UPC - 751398008337
View all Onkyo TX-SR876 manuals
Add to My Manuals
Save this manual to your list of manuals |
Page 65 highlights
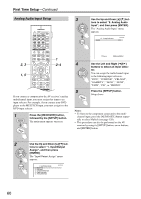
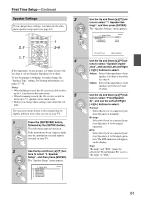
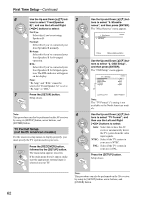
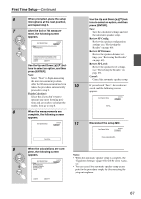
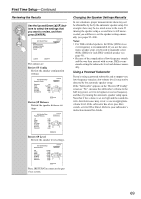
First Time Setup-Continued Measurement Positions To create a listening environment in your home theater that all listeners will enjoy, Audysssey MultEQ® takes measurements at up to eight positions within the listening area. ■ 1st measurement position This is the center position of your listening area, or the listening position if there's only one listener. ■ 2nd-8th measurement positions These are the other listening positions (i.e., the places where the other listeners will sit). You can measure up to eight positions. The following examples show some typical home theater seating arrangements. Choose the one that best matches yours, and position the microphone accordingly when prompted. TV TV TV TV TV TV Using Audyssey MultEQ® XT 1 2, 11 ON STANDBY TV INPUT DVD 1 GAME/TV 4 VCR/DVR 2 AUX1 5 CBL/SAT 3 AUX2 6 + TV CH - TAPE TUNER CD 7 8 9 PHONO NET/USB D. TUN TV VOL +10 0 CLEAR --/--- 10 11 12 INPUT SELECTOR MACRO 1 2 3 ZONE3 DVD REMOTE MODE VCR CD ZONE2 CDR/MD/DOCK 3-10 TV DIMMER + CH DISC ALBUM - PREV CH DISPLAY CABLE SAT TOP MENU NET/USB RECEIVER TAPE/AMP SLEEP MENU ENTER VOL GUIDE SETUP EXIT RETURN MUTING SETUP MIC TV TV TV : listening area - : listening position REC PLAYLIST RANDOM STEREO SP A SP B LISTENING MODE SURR Notes: • If any of your speakers is 4 ohms, change the "Speaker impedance" setting before running the automatic speaker setup (see page 61). • If the AV receiver is muted, it will be unmuted automatically when the automatic speaker setup starts. • Automatic speaker setup can only be used with Speakers A. • Automatic speaker setup cannot be performed while a pair of headphones is connected, or Speakers B is selected. • It takes about 15 minutes to complete the automatic speaker setup for three positions. Total measurement time varies depending on the number of positions and speakers. • Do not disconnect the speaker setup microphone during the automatic speaker setup, unless you want to cancel the setup. • Do not connect or disconnect any speakers during the automatic speaker setup. 65
-
 1
1 -
2
-
3
-
4
-
5
-
6
-
7
-
8
-
9
-
10
-
11
-
12
-
13
-
14
-
15
-
16
-
17
-
18
-
19
-
20
-
21
-
22
-
23
-
24
-
25
-
26
-
27
-
28
-
29
-
30
-
31
-
32
-
33
-
34
-
35
-
36
-
37
-
38
-
39
-
40
-
41
-
42
-
43
-
44
-
45
-
46
-
47
-
48
-
49
-
50
-
51
-
52
-
53
-
54
-
55
-
56
-
57
-
58
-
59
-
 60
60 -
 61
61 -
 62
62 -
 63
63 -
 64
64 -
 65
65 -
 66
66 -
 67
67 -
 68
68 -
 69
69 -
 70
70 -
71
-
72
-
73
-
74
-
75
-
76
-
77
-
78
-
79
-
80
-
81
-
82
-
83
-
84
-
85
-
86
-
87
-
88
-
89
-
90
-
91
-
92
-
93
-
94
-
95
-
96
-
97
-
98
-
99
-
100
-
101
-
102
-
103
-
104
-
105
-
106
-
107
-
108
-
109
-
110
-
111
-
112
-
113
-
114
-
115
-
116
-
117
-
118
-
119
-
120
-
121
-
122
-
123
-
124
-
125
-
126
-
127
-
128
-
129
-
130
-
131
-
132
-
133
-
134
-
135
-
136
-
137
-
138
-
139
-
140
-
141
-
142
-
143
-
144
-
145
-
146
-
147
-
148
-
149
-
150
 |
 |
