Optoma CinemaX P2 User Manual - Page 37
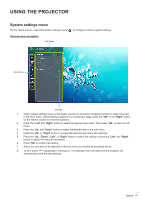
System settings menu
 |
View all Optoma CinemaX P2 manuals
Add to My Manuals
Save this manual to your list of manuals |
Page 37 highlights
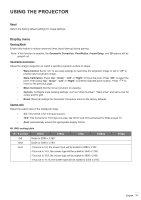
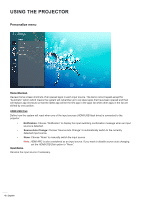
USING THE PROJECTOR System settings menu On the Home screen, select the system settings menu " " to configure various system settings. General menu navigation Sub Menu Main Menu Settings 1. When system settings menu is displayed, use the up and down navigation buttons to select any item in the main menu. While making a selection on a particular page, press the "OK" or the "Right" button on the remote control to enter the submenu. 2. Press the "Left" and "Right" button to select the desired menu item. Then press "OK" to open its sub menu. 3. Press the "Up" and "Down" button to select the desired item in the sub menu. 4. Press the "OK" or "Right" button to access the selected sub menu item settings. 5. Press the "Up", "Down", "Left", or "Right" button to select the setting or press the "Left" and "Right" button to adjust the value (if necessary). 6. Press "OK" to confirm the setting. 7. Select the next item to be adjusted in the sub menu and modify as described above. 8. To exit, press " " (repeatedly if necessary). The settings menu will close and the projector will automatically save the new settings. English 37
-
 1
1 -
2
-
3
-
4
-
5
-
6
-
7
-
8
-
9
-
10
-
11
-
12
-
13
-
14
-
15
-
16
-
17
-
18
-
19
-
20
-
21
-
22
-
23
-
24
-
25
-
26
-
27
-
28
-
29
-
30
-
31
-
 32
32 -
 33
33 -
 34
34 -
 35
35 -
 36
36 -
 37
37 -
 38
38 -
 39
39 -
 40
40 -
 41
41 -
 42
42 -
43
-
44
-
45
-
46
-
47
-
48
-
49
-
50
-
51
-
52
-
53
-
54
-
55
-
56
-
57
-
58
-
59
-
60
-
61
-
62
-
63
-
64
-
65
-
66
 |
 |