Panasonic HC-V380 Advanced Operating Manual - Page 232
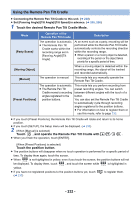
Using the Remote Pan Tilt Cradle, Touch the desired Remote Pan Tilt Cradle Mode., Touch
 |
View all Panasonic HC-V380 manuals
Add to My Manuals
Save this manual to your list of manuals |
Page 232 highlights
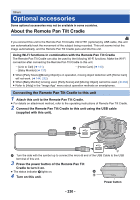
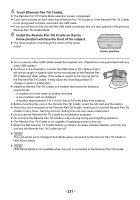
Using the Remote Pan Tilt Cradle ≥ Connecting the Remote Pan Tilt Cradle to this unit. (l 230) ≥ Set [Panning Angle]/[Tilt Angle]/[Tilt Speed] in advance. (l 235, 236) 1 Touch the desired Remote Pan Tilt Cradle Mode. Mode [Party Scene] [Moving Object] [Manual] [Preset Positions] Operation of the Remote Pan Tilt Cradle Description The operation is automatic. ≥ The Remote Pan Tilt Cradle works within the recording range set in [Panning Angle]/[Tilt Angle]. At an event such as a party, recording will be performed while the Remote Pan Tilt Cradle automatically controls the recording direction within the recording range. ≥ When a person or a moving object is detected, recording of the person or the object takes priority for a specific period of time. When a moving object is detected within the recording range, the object will be tracked and recorded automatically. The operation is manual. This mode lets you manually operate the Remote Pan Tilt Cradle. The operation is automatic. ≥ The Remote Pan Tilt Cradle moves to recording angles registered to the position buttons. This mode lets you perform recording from preset recording angles. You can switch between different angles with the touch of a button. You can also set the Remote Pan Tilt Cradle to automatically cycle through recording angles registered to the position buttons. ≥ For information on how to register them or use this mode, refer to page 233. ≥ If you touch [Preset Positions], the Remote Pan Tilt Cradle will rotate and return to its home position. 2≥ If you touch [SETUP], the Setup menu will be displayed. (l 235) (When [Manual] is selected) Touch , and operate the Remote Pan Tilt Cradle with ///. ≥ When you finish the operation, touch [ENTER]. (When [Preset Positions] is selected) Touch the position button. ≥ The position buttons will disappear when no touch operation is performed for a specific period of time. To display them again, touch the screen. ≥ When is not highlighted in yellow, even if you touch the screen, the position buttons will not POS be displayed. To display them, touch , and touch the screen while is highlighted in POS POS yellow. ≥ If you have not registered positions to the position buttons yet, touch (l 233) to register them. - 232 -
-
 1
1 -
2
-
3
-
4
-
5
-
6
-
7
-
8
-
9
-
10
-
11
-
12
-
13
-
14
-
15
-
16
-
17
-
18
-
19
-
20
-
21
-
22
-
23
-
24
-
25
-
26
-
27
-
28
-
29
-
30
-
31
-
32
-
33
-
34
-
35
-
36
-
37
-
38
-
39
-
40
-
41
-
42
-
43
-
44
-
45
-
46
-
47
-
48
-
49
-
50
-
51
-
52
-
53
-
54
-
55
-
56
-
57
-
58
-
59
-
60
-
61
-
62
-
63
-
64
-
65
-
66
-
67
-
68
-
69
-
70
-
71
-
72
-
73
-
74
-
75
-
76
-
77
-
78
-
79
-
80
-
81
-
82
-
83
-
84
-
85
-
86
-
87
-
88
-
89
-
90
-
91
-
92
-
93
-
94
-
95
-
96
-
97
-
98
-
99
-
100
-
101
-
102
-
103
-
104
-
105
-
106
-
107
-
108
-
109
-
110
-
111
-
112
-
113
-
114
-
115
-
116
-
117
-
118
-
119
-
120
-
121
-
122
-
123
-
124
-
125
-
126
-
127
-
128
-
129
-
130
-
131
-
132
-
133
-
134
-
135
-
136
-
137
-
138
-
139
-
140
-
141
-
142
-
143
-
144
-
145
-
146
-
147
-
148
-
149
-
150
-
151
-
152
-
153
-
154
-
155
-
156
-
157
-
158
-
159
-
160
-
161
-
162
-
163
-
164
-
165
-
166
-
167
-
168
-
169
-
170
-
171
-
172
-
173
-
174
-
175
-
176
-
177
-
178
-
179
-
180
-
181
-
182
-
183
-
184
-
185
-
186
-
187
-
188
-
189
-
190
-
191
-
192
-
193
-
194
-
195
-
196
-
197
-
198
-
199
-
200
-
201
-
202
-
203
-
204
-
205
-
206
-
207
-
208
-
209
-
210
-
211
-
212
-
213
-
214
-
215
-
216
-
217
-
218
-
219
-
220
-
221
-
222
-
223
-
224
-
225
-
226
-
 227
227 -
 228
228 -
 229
229 -
 230
230 -
 231
231 -
 232
232 -
 233
233 -
 234
234 -
 235
235 -
 236
236 -
 237
237
 |
 |
