Panasonic KX-FLM661 User Manual - Page 35
N in 1 feature, 2.4 Copy reservation, Copier
 |
View all Panasonic KX-FLM661 manuals
Add to My Manuals
Save this manual to your list of manuals |
Page 35 highlights
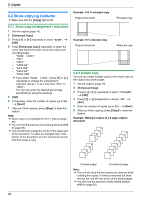
5. Copier Proof set feature To make 1 set of collate copy first, set the original and enter necessary settings for collate copy (step 2 to 3 on "5.2.2 Collate copy", page 34). Press {V} or {^} repeatedly to display "PROOF SET" (step 4 on "5.2.2 Collate copy", page 34). The unit will make 1 set of collate copy and stop temporarily so you can check whether the copy is made as you expected. If the copy is correct, press {Start} to continue copying. If the copy is not correct, press {Stop} and start again from the beginning. 5.2.3 N in 1 feature You can save paper by copying 2, 4 or 8 pages onto 1 page. The documents will be reduced to fit the recording paper. 1 Set the original (page 19). L To make a portrait copy, set the original in portrait direction. To make a landscape copy, set the original in landscape direction. 2 {Enhanced Copy} 3 Press {} repeatedly to select "N in 1". i {Set} 4 Press {V} or {^} repeatedly to select the number of original documents from "2 in 1", "4 in 1" or "8 in 1". i {Set} 5 Press {V} or {^} repeatedly to select the layout from "PORTRAIT" or "LANDSCAPE". i {Set} 6 If necessary, enter the number of copies (up to 99). i {Start} 7 After you finish copying, press {Stop} to reset this feature. Original document "2 in 1" Page layout "PORTRAIT" Original document "8 in 1" Page layout "PORTRAIT" "LANDSCAPE" Note: L You can save the previous N in 1 setting (feature #467 on page 56). 5.2.4 Copy reservation You can reserve your copy; - while the unit is printing documents from your computer. - while the unit is printing received fax documents. 1 Set the original (page 19). 2 While "PC PRINTING" or "PRINTING" is displayed, press {Copy}. 3 Make necessary settings such as number of copies, resolution, zoom features and N in 1 features. i {Start} L "COPY RESERVED" will be displayed. The unit will start copying after the current printing job. "LANDSCAPE" "4 in 1" "PORTRAIT" "LANDSCAPE" 35
-
 1
1 -
2
-
3
-
4
-
5
-
6
-
7
-
8
-
9
-
10
-
11
-
12
-
13
-
14
-
15
-
16
-
17
-
18
-
19
-
20
-
21
-
22
-
23
-
24
-
25
-
26
-
27
-
28
-
29
-
 30
30 -
 31
31 -
 32
32 -
 33
33 -
 34
34 -
 35
35 -
 36
36 -
 37
37 -
 38
38 -
 39
39 -
 40
40 -
41
-
42
-
43
-
44
-
45
-
46
-
47
-
48
-
49
-
50
-
51
-
52
-
53
-
54
-
55
-
56
-
57
-
58
-
59
-
60
-
61
-
62
-
63
-
64
-
65
-
66
-
67
-
68
-
69
-
70
-
71
-
72
-
73
-
74
-
75
-
76
-
77
-
78
-
79
-
80
-
81
-
82
-
83
-
84
-
85
-
86
-
87
-
88
-
89
-
90
-
91
-
92
 |
 |
