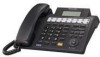
Panasonic KX-TS4300B 4-line/16 Ext.phone - Page 36
Storing items from the, redial list into the speed, dialer, Speed Dialer
 |
UPC - 037988477449
View all Panasonic KX-TS4300B manuals
Add to My Manuals
Save this manual to your list of manuals |
Page 36 highlights
Speed Dialer L To erase the character, press {ERASE} or select "Delete Char", then press {MENU/SET}. 9 Select "Done", then press { MENU/SET} . L To cancel, select "Cancel", then press {MENU/SET}. 10Enter (or edit) the phone number (max. 24 digits). L To erase the number, press {ERASE} or select "Delete Char", then press {MENU/SET}. L If required, you can insert {FLASH}, {REDIAL/PAUSE} or {*} (TONE) in a phone number. L To add the last number dialed, you can press {REDIAL/PAUSE} instead of entering the phone number. 11 Select "Done", then press { MENU/SET} . L To cancel, select "Cancel", then press {MENU/SET}. 12Press and hold {MENU/SET} to return to standby mode. Note: L To return to the previous menu, press {
-
 1
1 -
2
-
3
-
4
-
5
-
6
-
7
-
8
-
9
-
10
-
11
-
12
-
13
-
14
-
15
-
16
-
17
-
18
-
19
-
20
-
21
-
22
-
23
-
24
-
25
-
26
-
27
-
28
-
29
-
30
-
 31
31 -
 32
32 -
 33
33 -
 34
34 -
 35
35 -
 36
36 -
 37
37 -
 38
38 -
 39
39 -
 40
40 -
 41
41 -
42
-
43
-
44
-
45
-
46
-
47
-
48
-
49
-
50
-
51
-
52
-
53
-
54
-
55
-
56
-
57
-
58
-
59
-
60
-
61
-
62
-
63
-
64
-
65
-
66
-
67
-
68
-
69
-
70
-
71
-
72
-
73
-
74
-
75
-
76
-
77
-
78
-
79
-
80
-
81
-
82
-
83
-
84
 |
 |

Speed Dialer
36
For assistance, please visit http://www.panasonic.com/phonehelp
L
To erase the character, press
{
ERASE
}
or select “
Delete
Char
”, then press
{
MENU/SET
}
.
9
Select “
Done
”, then press
{
MENU/SET
}
.
L
To cancel, select “
Cancel
”, then
press
{
MENU/SET
}
.
10
Enter (or edit) the phone number
(max. 24 digits).
L
To erase the number, press
{
ERASE
}
or select “
Delete
Char
”, then press
{
MENU/SET
}
.
L
If required, you can insert
{
FLASH
}
,
{
REDIAL/PAUSE
}
or
{*}
(TONE) in a phone number.
L
To add the last number dialed, you
can press
{
REDIAL/PAUSE
}
instead of entering the phone
number.
11
Select “
Done
”, then press
{
MENU/SET
}
.
L
To cancel, select “
Cancel
”, then
press
{
MENU/SET
}
.
12
Press and hold
{
MENU/SET
}
to
return to standby mode.
Note:
L
To return to the previous menu, press
{
<
}
.
Editing/correcting a mistake
Press
{
<
}
or
{
>
}
to move the cursor
to the character or number you want to
erase, then press
{
ERASE
}
. Enter the
appropriate character or number.
Storing items from the
redial list into the speed
dialer
Important:
L
Make sure that the unit is in standby
mode.
1
Press
{
REDIAL/PAUSE
}
.
2
Press
{V}
or
{^}
to select the
desired number, then press
{
MENU/SET
}
.
3
Select “
Copy To SPD
”, then press
{
MENU/SET
}
.
4
Press the speed dial button (
{
1
}
to
{
16
}
).
OR
Press
{
LOWER
}
, then press the
speed dial button (
{
1
}
to
{
16
}
).
5
Enter the name (max. 16 characters;
see “Character table” on page 31).
L
To erase the character, press
{
ERASE
}
or select “
Delete
Char
”, then press
{
MENU/SET
}
.
6
Select “
Done
”, then press
{
MENU/SET
}
.
L
To cancel, select “
Cancel
”, then
press
{
MENU/SET
}
.
7
Edit the phone number if necessary.
L
To erase the number, press
{
ERASE
}
or select “
Delete
Char
”, then press
{
MENU/SET
}
.
L
If required, you can insert
{
FLASH
}
,
{
REDIAL/PAUSE
}
or
{*}
(TONE) in a phone number.
8
Select “
Done
”, then press
{
MENU/SET
}
.
L
To cancel, select “
Cancel
”, then
press
{
MENU/SET
}
.
9
Press
{
REDIAL/PAUSE
}
to return to
standby mode.
Note:
L
To return to the previous menu, press
{
<
}
.
3215555
Select SPD Key